


Big Ideas for this lesson: Create a momentary fabric switch, Code your toy with Scratch, Create kid- friendly alligator clips with clothespins for smaller hands! Be challenged to create a body systems toy!
| Introduction to the Challenge |
|
In the last class, you learned how to make switches out of everyday stuff. What if you used this simple switch ideas and simple sewing materials to hack a toy? Today, you will use conductive fabric material for your invention instead of office supplies. To create an interactive toy, you will make two conductive spots on your toy that will complete a circuit when the two spots are pressed together. Big Ideas for this lesson:
In this Maker course, we are experimenting with different materials for different inventions to help you start experimenting with your own ideas for creating switches. In the same way you can make two pieces of foil touch, you can invent all kinds of actions that will close a switch to send a signal with Makey Makey.
Here are some common materials when creating sewable electronics. Did you know that you can get thread that is conductive? Conductive thread is made with stainless steel fibers and can be used in place of alligator clips for sewing wearable electronic projects. The other notions (that's a sewing term to describe small sewing objects or accessories) you can use are quite common. We've had success with metal clasps and sewable metal snaps for our own Makey Makey invention hacks.
Let's grab an old toy and give it a new purpose. In this maker series, we want the projects to be a little more open ended. You can create your toy hack like ours, or you can make different design choices. Design Considerations You have three big decisions to make. First decide how you want to make your toy interactive and next decide what you want your toy to do. How will you actuate the switch? (Actuate means the physical movement that controls your switch.) Do you want a momentary switch or a maintained switch? (Remember these are the switch ideas from our last maker class.)
You will use conductive fabric material in place of foil make a switch. To create an interactive toy, you will make two conductive spots on your toy that will complete a circuit when pressed together (or actuated). If you don't have conductive fabric or thread, you can still use foil, sewable metal snaps, or even clamp binder clips on your toy. If you don't want to use conductive thread, skip down to the alternative "no sew" step. Using a different material to make this switch helps you get started with experimenting with everyday materials to create your own switches and components. You can follow our toy hack, or hack a toy in your own way! You’ll need:
|
|
|


| Sewing a Momentary Switch with Conductive Thread |
|
Place a small piece of conductive fabric tape on each hand of your stuffed toy.
Then thread a needle with about 24” conductive thread. Tie a knot at the end of the thread. Use the needle to poke from the back of the stuffed toy’s hand, up to the conductive fabric patch. Make sure the thread comes up and over so that is makes a connection on the top of the fabric tape.
Bring the needle back to the backside of the stuffie’s hand, make one more stitch on the back of the toy, and tie a knot. (I like to come back through the thread and pull my needle through this loop to make a knot. )
You should have a spot now to clip your alligator clip to on the back of your toy’s hand. Clip one alligator clip to each hand.
On your Makey Makey, plug one alligator clip to "SPACE" and the other to an EARTH connection on the bottom row.
Now when your toy’s hands touch, it will make a connection just like your simple foil switch. Cool momentary switch, eh? |
|
|


| Alternative: No- Sew Method with Hook Up Wire |
|
Maybe you don't have access to conductive thread? This step will show you how to use everyday office supplies and the materials in your Makey Makey kit to hack a toy. The small white wires in your kit are called hook-up wire. These tiny wires are commonly used in electronics and cut to length, then soldered to hold projects in place and ensure conductivity. These wires fit in the back of the board (we'll have a class on that soon!) but you can use them in any project. If you don't have conductive thread, you can use a hook up wire and poke it through your toy, just like you would use a thread and needle. Using needle nose pliers, wrap the exposed end of the wire onto the end of a safety pin. The exposed end needs to be attached well to the safety pin so we can extend the conductive area from the wire to the safety pin (you could also use a binder clip instead of a safety pin.)
Cover the wire on the back of your toy with some low adhesive masking tape to keep it in place.
Now clip an alligator clip to the exposed end of the hook up wire.
Cover the alligator clip as well so it doesn't come loose.
Repeat in another spot on your toy, and now when those two conductive spots come together, you will complete the circuit. |
|
|


| Code in Scratch |
|
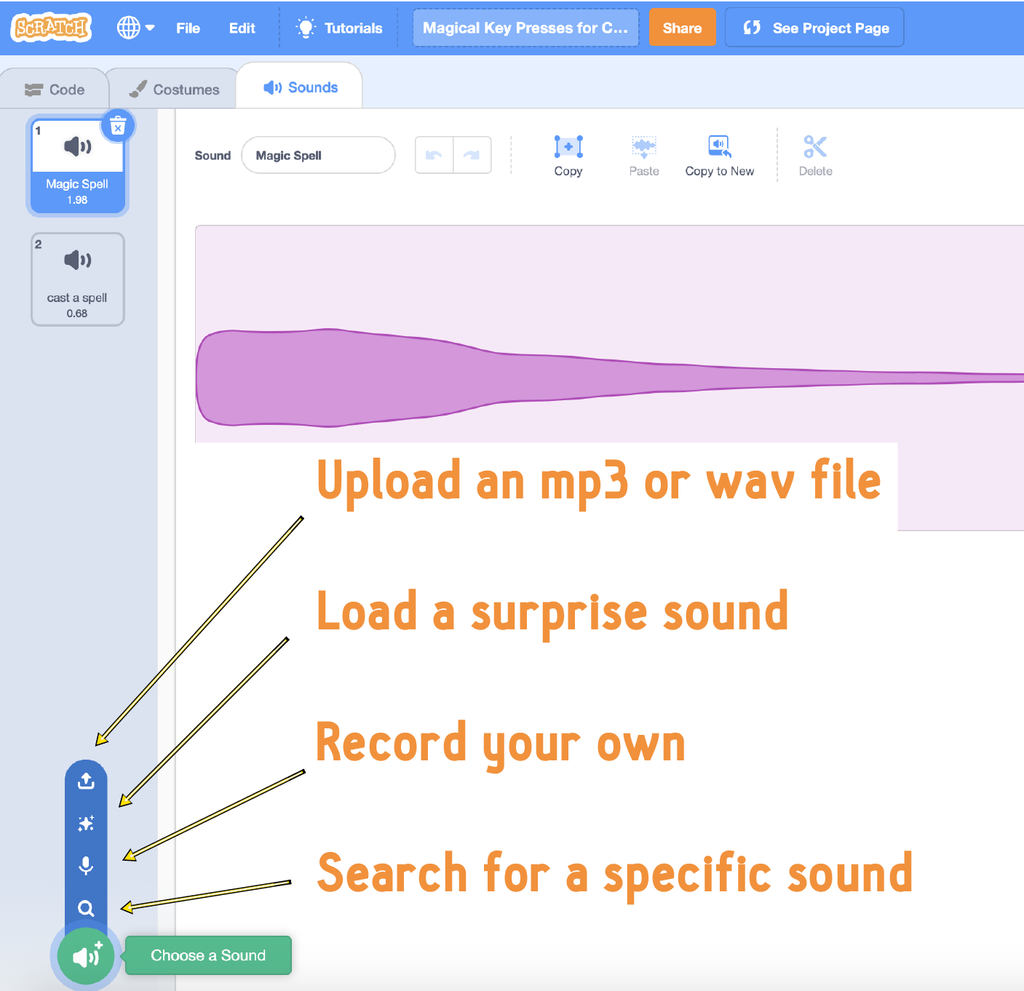
You can use your coding skills from the class "Code Your Key Presses in Scratch" to record and code sound effects, code your toy to be a musical instrument, or code your toy to be a game controller! This step is up to you to design and decide! See our game example here - it inspired us to go further and make a body systems toy. Further instructions are in the next step!
|
|
|


| Going Further: Create a Human Anatomy Learning Toy and Kid- Friendly Alligator Clips with a Clothespin |
|
Sometimes those alligator clips are really difficult to pinch open and closed. Let's make a kid friendly version with a clothespin, so your little brother or sister can easily clip to different conductive spots on your toy. (This clips will function as EARTH so you can have multiple key presses on your toy. )
You need:
First take the clothespin apart. Just wiggle off the metal spring.
Next cut two strips of foil to fit on the clothespin. Then use a glue-stick to adhere to the surface of each clothespin piece. You need one foil to wrap the entire length of the clothespin and the other side can just cover the front of the clip.
Put your clothespin back together and attach an alligator clip to the end where the foil wraps around the end.
Now you are ready to test on your toy. You can create multiple conductive spots, then in Scratch, you can code the descriptions of your toy's anatomy or body system. Your toy may have multiple hearts, or three stomachs (like a cow!) or maybe your toy is an animal and you can actually code the real descriptions of the animal's body system.
Try our Scratch game here, by pressing the up arrow, left arrow, or spacebar to learn about our monster's weird and wacky body system! ExtensionsHere are some cool projects by others that use a similar method for teaching human anatomy:
Bonus: Here's a video guide that also shares how we coded our stuffie!
|
|
|


Supplies
- An old toy
- Conductive fabric tape
- Conductive thread
- Two alligator clips
- Makey Makey
- Sewable Conductive Notions (Optional)