


DIY Tilt Joystick
Tilting Cup Joystick
Our hope is that you build custom sensors and inputs with Makey Makey using everyday materials to emulate sensors you find in different goods and products around you. Better yet, we want to inspire you to invent something completely new and innovative!

Introduction
Each sensor you build with Makey Makey can also be used with these special devices called "microcontrollers". This project is an open-ended way for you to play, create, and tinker with creating your own handmade sensors out of everyday stuff. As a start we are making a tilt sensor we will use as a joystick, but that is only the start! Once you build your fist sensor a whole new world of ways to physically interact with your computer will open up to you. All it takes is time, some recyclable materials and an open mind.
What You Need to Know...
Crafting Skills
Coding Skills
Time Investment
Background Information
This project assumes you have at least a bit of experience with a Makey Makey and know the basics! If this is your first time using a Makey Makey or are need a bit of a refresher, check out these quick projects to get you rolling.
Getting Started with Makey Makey
Hello Light

Learn about what a circuit is and the basics of electricity and conductivity to build your first paper circuit!
Is it Conductive?

Build a conductivity tester that uses Makey Makey to help you figure out what materials are conductive and which ones aren't!
Banana Piano!

Use bananas or any other produce to build circuits and turn them into piano keys using Makey Makey and our free Piano App!
Tools and Materials
This activity requires you to dig in and build something. Though the list of tools and materials is short, there are a few specific things that you will need...

Tools
- Scissors - Used for cutting paper, tape and other things other than your fingers!
- Glue / Glue Stick - We will glue tinfoil to some cardboard, hopefully not our fingers!
- Makey Makey - The tool that makes the magic happen!
- USB Cable - The cable to plug the Makey Makey into your computer!
- Computer with Internet Connection - We will be using an app in Scratch that is shared online!
Materials
- Tin Foil- For making the Earth pad for our joystick
- clean yogurt cup- Did we mention to make sure it's clean! A plastic cup will also do
- Alligator Clips (5) - five cables, different colors!
- Conductive Fabric Tape- tape made from woven stainless steel!
- Metal pushpin- Make sure it is metal!
- Steel ball bearing- You can also use a marble wrapped in tin foil as well
Need Supplies? Time to Get Resourceful!
Maybe you want to make your project bigger, more refined, or use this idea with a bucket rather than a cup. All awesome ideas and we totally want you to play with the materials you have on hand.

You may have noticed that not all of the materials above are included in our kits! That is OK and intentional; we want you to be resourceful and use materials that you can find at home, in the classroom or even out of a dumpster! It’s great to know this ahead of time so we recommend thinking about creating a stockpile of materials when you find them. We recommend holding onto the following materials / items when you find them…
- Breakfast cereal boxes
- Cardboard / shipping boxes
- Cardboard tubes
- Small broken electronic toys
- Tape, stickers, etc.
What's a Sensor?
Sensors and microcontrollers power and control much of our digital lives. But what is a sensor? And what is a microcontroller? To put it simply, a sensor is an input device that senses something (light, motion, sound) and makes it useful within a system. That system can be something as simple as an alarm clock or a toaster oven, or as complicated as the break system in a car or the life support system on the International Space Station.

To simplify the idea of a sensor we can think that electronic systems are a lot like us! Let’s take a brief look and we hope it will help you further your understanding of what a Makey Makey does and how you can expand the complexity of your projects by building and adding sensors to it.
Just like us, most electronics have a nervous system. You have probably learned about a circuit and that they can be compared to our nervous system… It's our wiring that connects our inputs and outputs to our brain. With that information our brains make decissions and react accordingly. Let's see how this plays out in our comparison to electronics!
Sensors
Sensors are like our 5 senses. We have smell, sight, hearing, touch and taste. That is how we measure the world around us. Light is measured with our sight, temperature with skin and sound with our ears. All of those senses have a range of value that our body measures; a degree of hot or cold as an example.

But, our skin doesn’t make the decision that it is really hot and it's time to go get a drink of water or that something is too loud and we need to cover our ears, that is done by our brain. Our brains use our five senses to measure more complicated things. A great example is that we can feel the temperature getting cooler outside and see a dark cloud on the horizon. Both of those pieces of information on their own mean little to us, but by combining them with our experiential knowledge of weather, or brain takes that information and tells us that a storm is coming. In the same way digital electronics use sensors to collect information and then logic or a decision making process is programmed into its brain... the microcontroller.
A Microcontroller
But what the heck is a microcontroller? Microcontrollers are tiny little computers that have very specific functions; a simple brain in our illustration. Most microcontrollers unlike our brains are programmed to do a single thing over and over again.

Microcontrollers are all around us and are what drives and controls electronic devices to make decisions based on sensor inputs and react with specific outputs accordingly. Someone designed those systems and programmed the microcontroller to react in specific ways to given inputs from sensors. Your thermostat in your home is a great example. You set a temperature you want it to be, which is an input from you. The thermostat then periodically takes the temperature of the room and then controls your furnace to turn on when it is colder than that temperature or turn off when it is higher.
A Makey Makey
Your computer mouse has a microcontroller that probably uses a laser to sense the direction you are moving the mouse. A handheld calculator has a microcontroller chip inside that tells it how to behave like a calculator. If you look at the back of your Makey Makey circuit board, you’ll see a tiny black blob of plastic. Under that blob is a microcontrollersquare with silver legs that resembles a bug. THAT IS THE BRAINS OF YOUR Makey Makey! This little microcontroller tells your computer that you’ve plugged in an external keyboard. The Makey Makey board has 6 “inputs” on the front that function as your computer keys.

When an EARTH is connected to a key press input, you complete a circuit.The microcontroller sees that that circuit was completed and responds by telling the computer that you pressed that specific key. Since Makey Makey allows you to tell your computer that everyday stuff is now your computer keyboard, you can “make” any conductive thing (like a banana) one of your computer “keys.” That’s why it’s called a MaKey MaKey!

You can think of the Makey Makey as a computer's version of your sense of touch. When someone touches your hand, you respond in some way. The computer just responds by interpreting that as a space bar rather than a high-five.
Sensors for Makey Makey!
There are hundreds of different sensors out there and people use then with a lot of different microcontrollers like Raspberry Pi, Arduino, and Micro:bit, but with a bit of ingenuity you can actually create your own sensors out of simple materials to use with any of these boards. In fact we want to let you in on a little secret… Many seemingly “advanced” sensors are just engineers being clever with the idea of a switch or series of switches.
Many of our kits and projects will help you get inventive by creating switches, motion sensors, weather sensors, and more.! Go, be clever and build your own sensors!
Building a Tilt Sensor (Joystick)
As a first experience for building a more advanced sensor we will be building a Joy Stick that is a two axis tilt sensor that completes circuits based on you tilting it left, right, forward or backwards. If you strip away all of the plastic this is a similar way that many motion control game controllers work. Sweet! Let's jump in...
The first step to making your 2 axis tilt sensor is to create one conductive pad for EARTH in the base of your yogurt cup.
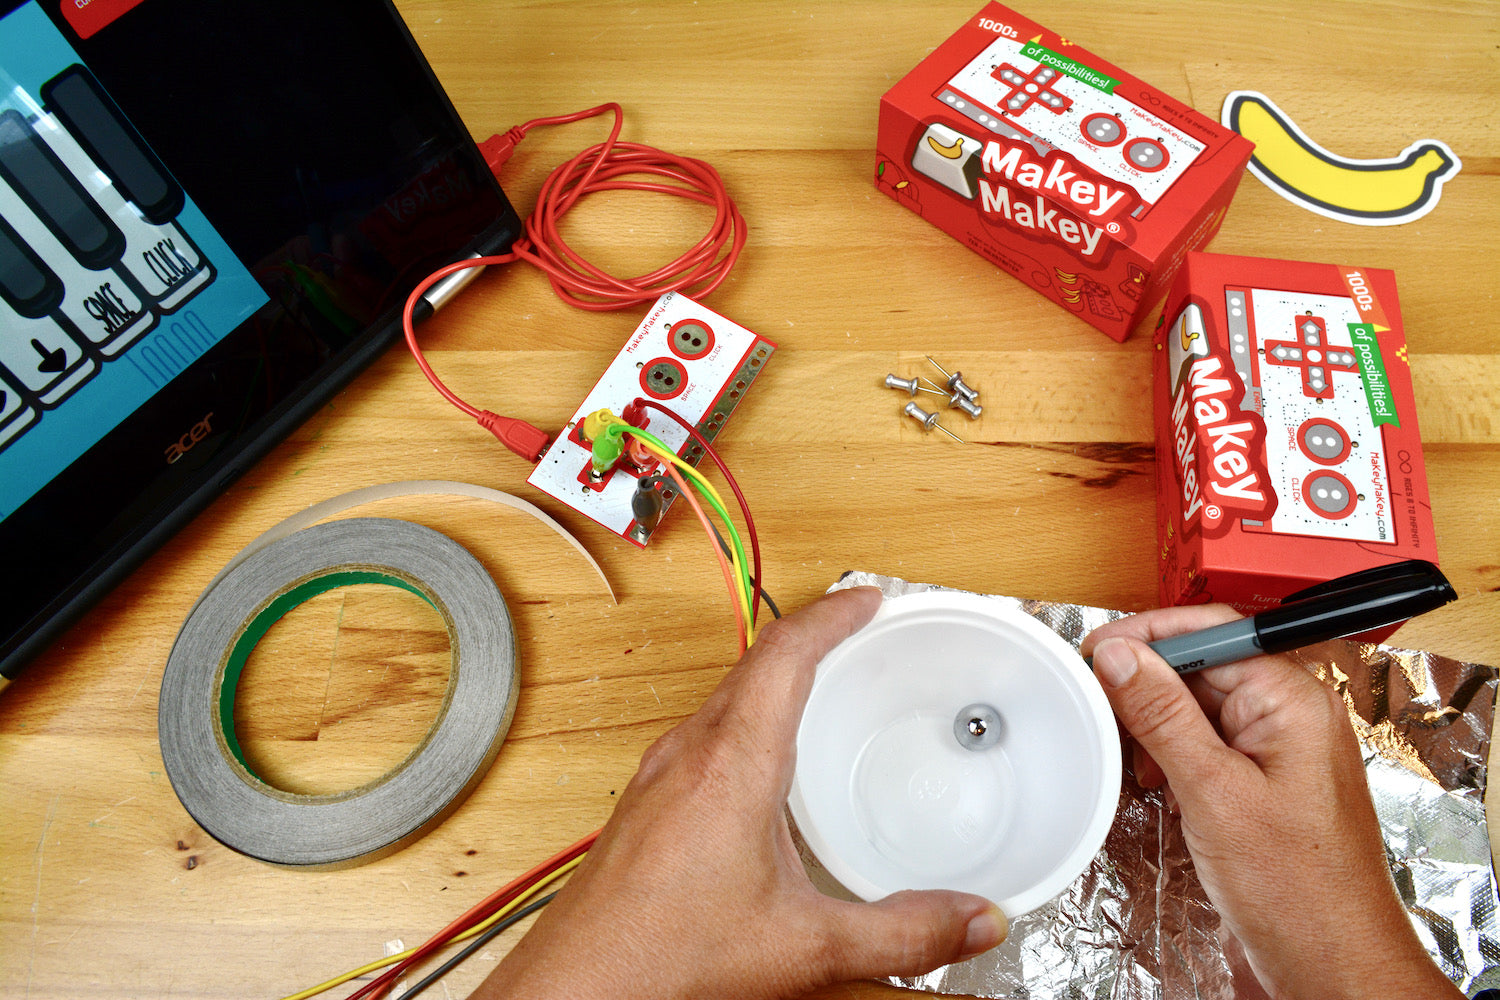
Take a piece of foil and place your yogurt cup on top to trace the bottom and make an EARTH conductive touch pad that you will place inside the yogurt cup.

Use a gluestick to adhere the foil to the bottom of your cup. Place the ball inside and make sure the EARTH touchpoint does not come up on the walls of the cup. In the next step, you’ll use tape to create conductive touchpoints. The metal ball will bridge the tape touchpoints to EARTH and complete the circuit.

To make your X and Y axis you need to place four pieces of conductive tape from the inside of the cup to the outer rim. Make sure your tape comes close to your EARTH touchpad, but does not touch it. (Otherwise, you’ll already be closing that circuit!) Make sure to place your tape at 0 for up, 180 for down, 90 for right, and -90 for left.

Place the tape near EARTH (but not touching) and use your thumb to press the tape smoothly against the wall of the yogurt cup. Then wrap the tape around the edge and cut the tape.

Use the metal thumbtack from your kit to press through the EARTH touchpoint so you can clip an alligator clip on the outside bottom of the cup.

Plug an alligator clip from the up arrow to the tape placed at 0 , Place the left arrow alligator clip to -90, the right arrow key alligator clip to 90 and the down arrow key alligator clip to 180. Now plug in your Makey Makey and put a metal marble into your cup! Will the marble connect the EARTH touchpad to each tape connection? Make sure there are no short circuits and get ready to roll some music!
Open the NEW Piano app and try your connections and use your controller as a funky instrument. As the ball rolls, it should make contact with the EARTH input and tape inputs to play musical notes!

Tilt-a-Sketch
The Makey Makey Piano App may be a quirky way to play music, but after a bit, you probably could think of a hundred better ways to do it. So, we set about thinking of a good app that the Tilt DIY Joystick would be fun and interesting to use with and we came up with our own Etch-a-Sketch style app called Make-a-Sketch!

The Makey Makey Make-a-Sketch App is designed to work with Makey Makey right out of the box. The left and right knob controls are set to the Makey Makey LEFT and RIGHT as well as the up and down knob controls set to the UP and DOWN keys on the Makey Makey. So, your Joystick controls should work right away.

If you want to get fancy (which we hope that you do!) you can open up the control panel by clicking on the lock button in the upper right of the app and change the pen thickness and the color of the pen as well. To reset (shake) your drawing, press the spacebar.
Now, go draw the Mona Lisa with your new DIY Controller and show it off to your friends…
We hope that this fun DIY joystick controller inspires you to build other DIY senors and think outside of the box, or in this case outside of the cup when it comes to using Makey Makey to create your own custom game controllers.
Troubleshooting
When you build your own sensors they don't always work the way you think they may right away. If you are having troubles with your DIY sensor here are a few tips from us...
- My tilt sensor joystick doesn't work at all! Make sure you are connected to earth using the pushpin and that your alligator clip is secure
- I am not getting the correct keypress from my sensor?! Double check your wiring and orientation of your cup. Up to Up, Down to Down, etc.
- I am getting a constant keypress!? Makey sure your conductive fabric tape isn't touching the earth pad by itself.
Going to the Next Level!
Now that you created your own DIY sensor with Makey Makey, you can start building your own inventions or other sensors! When we learn how things work so we can make new things, we call this Invention Literacy. Makey Makey was created to help you see the world as a construction kit! One of the coolest things about Makey Makey is you can use it to prototype new inventions and ideas. What is a prototype? It's like a rough draft of an invention. Since you can use everyday items from around the house to create inventions, Makey Makey is a great way to make a rough draft of an invention idea! Each draft of your invention is called an iteration. Here are a few ideas and other projects that can help you iterate on this project and bring your ideas to the prototype stage...
- Single Axis Tilt Sensor - Create a similar tilt sensor, but with a cardboard tube that works in only one axis
- Crafting and Designing Switches - Build other switches with materials you find around you!
- Big Mac Switch - Create a pressure sensitive switch with cardboard and a bit for foam!
Once you've crafted a circuit, it's time to take your newly found super power and tackle some other challenges that use the Makey Makey. For starters check out these other lessons and projects.
Other Craft & Code Projects
DIY Controller

Build your own game tilt based controller with Makey Makey and a yogurt cup. Test it out with our Make-a-Sketch App!
Drawable Circuits
Draw your own playable instrument, connect Makey Makey to your drawings, and jam out with this Activity and a choice of sounds Apps.