If you have never used Microsoft MakeCode before, it is a wonderful tool to start learning how to code. Originally developed and released as a programming platform for the BBC micro:bit several years ago, it has now expanded to include several other platforms in the hardware and software space. Let’s start with the MakeCode version called MakeCode Arcade, a game development platform for you to create your own old-school style video games! With Makey Makey, you can invent your own controllers for the games you code!
| Welcome to MakeCode Arcade |
| In this getting started guide, we will walk you through creating a new game in MakeCode Arcade, including navigating the environment, adding the Makey Makey code extension, and creating a simple “Hello World” program to move a character around the screen with Makey Makey. |
| Get Acquainted with MakeCode Arcade |
|
MakeCode Arcade is a block-based programming environment similar to Scratch or Blockly where you “snap” or place different code blocks together to build a program and, in this case, a game. Navigate to arcade.makecode.com click on ‘New Project’ and give your game a quick name. You should now be on a window similar to the image below. Let’s get oriented to the MakeCode programming environment where you will be programming and building your games.
(1)The main focus of the window is taken up by your programming space where you assemble your game code. (2)You can find all the code blocks you need to build a game in color-coded and sorted drawers . These drawers are themed around the functionality of the programming blocks they hold. Microsoft has also color-coded the blocks to make it easier to find things. Quick Tip: If you ever have difficulty finding a block you are looking for, you can always use the search box at the top of the block drawers! (3)When you start to build your game, it will be previewed in the simulator window where you can test the game out by clicking on the controls or using keyboard controls. In our case, we will be using a Makey Makey rather than a keyboard and mouse! (4)You can save your work by naming the file and clicking Save. This will download the file to your computer, but it will also save the game to the cookies on your computer in case you want to work on it later. (5) When you get to the point of wanting to share your game for others to play, you can use the share button and choose from a number of ways to share your game with others, embed it in a website or blog, or even add it to a MakeCode Arcade Kiosk (more on that later!) (6) Finally, as you build your skill and understanding of coding you can switch between the drag and drop blocks and different text-based languages (javascript or Python) for some advanced programming options. |

| Let's Start Programming |
|
As a first program, we will create a basic demo level of a game and a character we can move around with the controls.
First, we need to create the game's setting by adding a background. When you create a new program, your programming space starts with an on start block. Any code blocks you place inside of that block will execute or run at the start of your game. So, the first thing we do will be to add a set background color to ___ block inside of the on start block.  You can find the set background color block under the scene drawer. Click and drag the block into the on start block. If the volume is turned up on your computer, it should snap into place with a satisfying clicking noise.  From there, you can select a color of the background you want by clicking on the color swatch inside of set background color to ___. Once you choose a color, your simulator window should change to that color. Now, to add a character! With the background color set, it is time to place a character for us to control on the screen.  We do this by opening the Sprites drawer and dragging in a set mySprite to____ block into your programming space and inserting it into the on start just below the background block. After placing the block, select an image for your sprite. Click on the swatch just inside of the blue sprite block opening up a sprite editor.  In MakeCode you can draw your own characters, but for this example, we will select an existing image from the gallery by selecting the “Gallery” tab at the top; feel free to choose any sprite you want from the list!  When you return to your programming window, you should see an updated simulator with your character in the center of the window. Now we have a character but no way of controlling it! This is because we haven’t programmed the character to move yet. A computer is only as smart as its programmer. Let’s make this game a little smarter! To enable controlling a sprite with your computer's keyboard keys (or the simulator buttons), we need to add the move mySprite with Buttons block from the Controller drawer.
This block will enable you to move the selected sprite with the controller buttons and keyboard arrow keys, or even better… a Makey Makey! You should now be able to go over to the simulator with your mouse and hover over the window to bring it to focus. Press the arrow keys on your computer keyboard to see if your character moves around. Your final MakeCode Arcade program should look something like the above screenshot! |
|
|


| Plug and Play with Makey Makey |
|
Using your USB cable, plug the Makey Makey into your computer's USB Port. It is ready to use once the Makey Makey has gone through its blinky cycle. Since Makey Makey works by completing a circuit, touch EARTH with one finger and then touch the right arrow key with another finger. Make sure to press them at the same time. 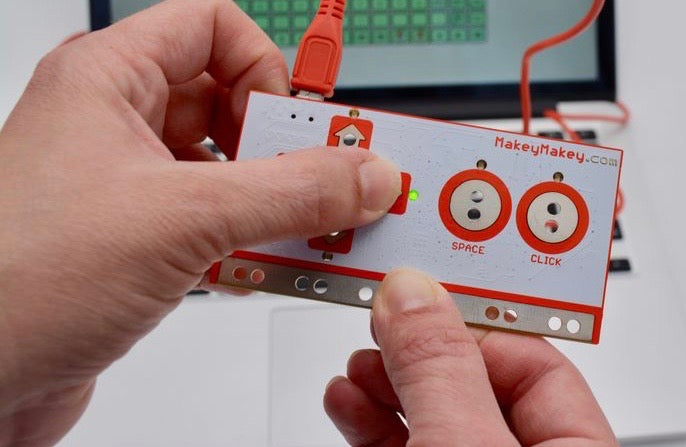 Touching EARTH and an arrow key input should complete the circuit between the two pads, and your character should move in the direction of the arrow key you pressed! If your character doesn’t move for some reason, here are some troubleshooting tips:
Inactive controller
|
|
|

| Adding the Makey Makey MakeCode Extension |
|
Many games are simple enough to use Makey Makey with just the move with buttons block. However, you will quickly find that you want to use other buttons in MakeCode, like the A and B buttons. These buttons are not mapped to the Makey Makey natively, so we created a MakeCode extension to make the Makey Makey fully functional with MakeCode arcade for both single-player games and more elaborate two-player games. Adding the Makey Makey extension to your MakeCode Arcade games is pretty straightforward. Once you have created a game, it is just a few clicks away!
To add the extension, click on the Extensions drawer, which will open up a selection of community extensions that enable you to add different packages of blocks to your program.
In the search bar, type “Makey Makey” and it will bring up our extension. Click on it to load it into your project.
Once the extension loads, you will have a Makey Makey drawer with coding blocks specific to Makey Makey. Click on the Makey Makey drawer to see the Makey Makey coding blocks!
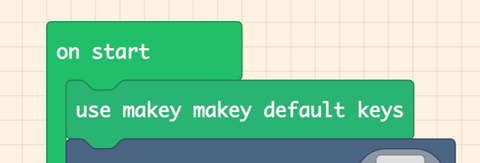
The first block maps the Makey Makey keys to the MakeCode Arcade keys (mapping A and B buttons to SPACE and CLICK on your Makey Makey). This will be one of your new favorite coding blocks! All you have to do is to add this block to the top of your on start event block in any program. This block will make Makey Makey work for all the MakeCode Arcade buttons right out of the box! The second block is a more in-depth block to map the different inputs on the Makey Makey to other controls for different players. You will use this in the case of a multiplayer game or if you want to use different inputs for player 1 in a single-player game. If you would prefer to control your sprite with WASD rather than the arrow keys, this block is what you would use to do that. We will incorporate this block into more advanced games in our How-to series!
Where to go now? Now that you have the basics of building and playing games in Microsoft MakeCode Arcade, we recommend you check out our series of project How-To guides! We walk you through how to program different games and recommend controllers to explore with Makey Makey to control those games! To get started, check out the first game in the series - Tag! |
|
|