


In this project, we will build a basic tag game for our first real game with Microsoft MakeCode Arcade. In the introduction, we created a character or ‘sprite’, and we were able to move it around the screen using the arrow keys on our keyboard or with our Makey Makey. We will build on that concept and add another sprite that will follow/chase our player sprite. The game's goal will be to go as long as you can without getting tagged (obviously).
| Setting the Scene for Your First Game |
|
If this is your first time using Microsoft MakeCode be sure to start with our Introduction to MakeCode Arcade with Makey Makey for a brief introduction to the environment and using Makey Makey with MakeCode Arcade.
First, create a new game in MakeCode and name it whatever you like, but we will name our game ‘Tag.’ The best games tell a story, and the best stories have a great setting. So, we need to set the stage for our game and that is done through setting the background. In the introduction, we used background color; we will use a background image instead for this game.
From the Scene drawer, select the set background image to___ block. This block is similar to the background color block but enables you to use an image rather than just a color. Place the block at the top of your on start block and click on the swatch, then find a thumbnail image in the Gallery tab to choose your setting.
Remember, we are telling a story here, and the background sets the mood and theme of that story! So choose wisely!
Once you select the background image of your choice, click Select, and you can edit it further if you want. Once finished, click done in the lower right corner. |
|
|


| Create a Player Sprite |
|
With the background selected, we now have to add the character we will control: our sprite.
We add a sprite by opening the Sprite drawer and adding the set mySprite to___ block, placing it just below the background block in the on start block as the image shows. The set mySprite to__ block is a valuable and powerful block; you will use it a lot in creating games in MakeCode, so we will take a moment and review it in more detail here. It has three components, each of which will help you as your games get more complex. Let’s dive in and see what these components are.
First off, your sprite has a name! When you create a new sprite, MakeCode gives it a generic name of mySprite. If you were to create a new sprite, MakeCode would name it mySprite2 and so on. This is just fine for simple games, but as you add more and more sprites, you may want to name them something more descriptive. You can create a custom sprite name by clicking on the drop-down next to the mySprite name and select rename variable and type in whatever name you would like!
Next up is the sprite image. You have experience with this already, so let’s select the image for your player sprite now! Remember to think about the story you are telling and to choose a sprite that would make sense for your game.
|
|
|


| Create an Enemy Sprite |
Now, create a sprite for the character who is ‘it’! From the Sprite drawer bring in another set mySprite to ____ block and place it just below your first sprite. 
|
|
|
| Set Location |
|
Once you create your 2nd sprite, you will notice that both sprites start one on top of the other.
So, we need to change the starting location of the characters. First, the one who is it, and we do that by using the set Sprite position to x __ y __block. This block sets the X and Y coordinates location of the sprite. Place the block as shown, select your ‘it’ sprite, and click on one of the numbers in the block.
This will bring up a tool to let you choose the spot on the screen without having to guess the x and y coordinates. 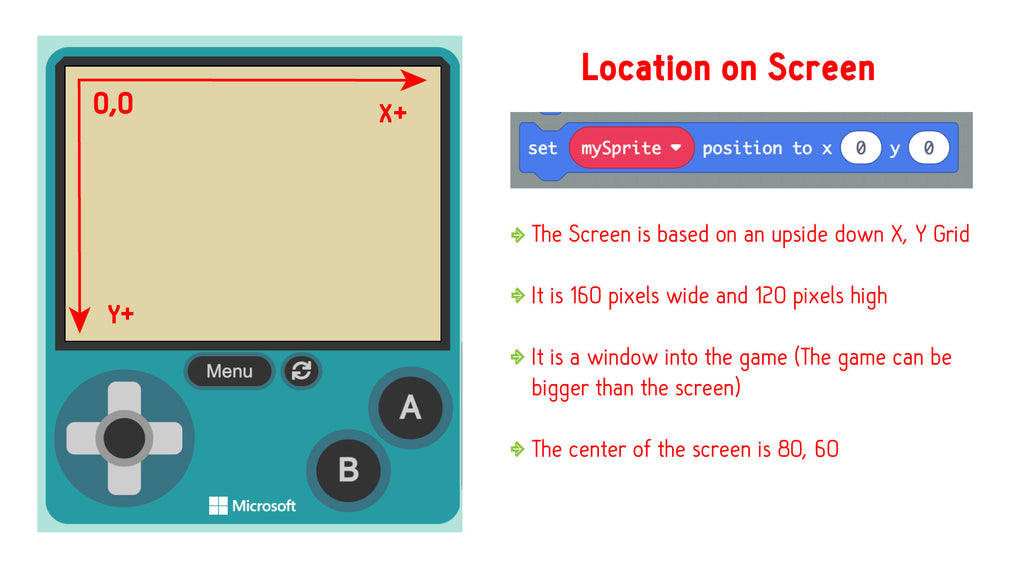 We selected the very top of the window. This tool then populates the correct X and Y coordinates for you. You should see your sprite move up to that position once the simulator runs.  If you want to start your player somewhere else on the screen, you would repeat the process: adding another location block, assigning it to that sprite, and selecting a spot.
|
|
|


| Controlling the Sprite |
|
Now, to get things moving! We need to code movement for our player character that we want to control with the arrow keys, but we also want to code the “it” sprite to chase our player. As in the getting started guide, we need to add the move mySprite with buttons block from the controls drawer to our program just below the set position blocks. We do not need to add anything other than this block to get our player sprite to move with basic controls.
There is a handy block for getting the bad guy or the “it” sprite to chase us! It is called the set ____ to follow ____ block. This block tells one sprite to follow another sprite. That is perfect for a game of tag! The one issue is that the sprite doing the following will be really fast! To change the speed of the following sprite, click on the block's plus sign (+) and change the value to something lower; we recommend starting at 50.
Now, test your game! You should be able to move your player sprite around the window while the “it” sprite chases you. There is a problem, though! Nothing happens yet when the “it” sprite touches you because you need to write the program to tell the game what to do. |


| When Sprites Collide |
|
We will now program the tag functionality and tell MakeCode what to do when the two sprites touch each other.
Enter the on sprite of kind Player overlaps otherSprite of kind player block! This is an event block, meaning it will only run the code inside it when the given event trigger is true. In this case, when two different sprites overlap one another, it will trigger the event. For this first game, we will use this in its most simple form and add complexity to it in future games. Open the Sprites drawer, and you can find this block towards the bottom of the list under the Overlaps category. Drag it into your program. It should be on its own and shouldn’t fit into the on start block. The functionality of an event block is that it is its own little program inside of a program! There is one change you need to make to this block, and that is to change the second sprite kind to an enemy kind of player, so the event will be triggered when one player sprite overlaps another sprite of the enemy kind.
Now, what happens when you are tagged? In this game we want the game to be over! Find the game over ___ block from the Game drawer and drag it into the overlap event block. Now, change the state of the game over ___ block to lose. When you test your game, you should be able to run around and avoid the it sprite, but when it finally catches you, the game should end in a losing state!
|


| Winning Scoring |
|
But how do you win? That is a great question, and to be honest, the biggest issue with tag in general is that there isn’t really a winner! To be fair, we will add a game component of keeping score so you can compete against your friends. We will track how many seconds you can go without getting tagged and reward you with a score by incorporating another event block that will trigger scoring!
The event block we use is called the on game update every _____ms block. This block is triggered in increments of time. You can find the block in the Game drawer. Click and drag one out into your program just below your on start event. Using the dropdown menu, change the value to 1 second (1000 milliseconds). Triggering this event every second!
Now, we want to change the score every second you aren’t tagged! From the Info drawer, find the change score by ____ block and drag that to the on game update every _____ms block. Now, when you test your game out, you should see a score counter in the upper right corner of your window, increasing each second that you are not tagged. When you are tagged, the Game Over window will show your final score! That is how you program tag in Microsoft MakeCode! For a full coding reference, you can check out the completed game below (check out the game in MakeCode here.)
|
|
|


| Recommended Controller and What's Next? |
|
There are so many ways to incorporate a Makey Makey controller into this game. The one requirement is that it needs the four direction arrows for you to control your character’s movements: up, down, left, and right. A couple of controller options that we recommend are as follows. Taking Your Game to the Next Level… We know that this game is rather simple and can get old quickly. It is designed to be a starting point for you to build from, not a finished product! We urge you to take the game to the next level and add to it. Change it up and make it your own! A couple of ways you can explore how to do this…
|
|
|
Supplies
- Makey Makey
- Create your own Controller!