


Craft a city out of cardboard, or draw a city to make an interactive poster. The idea behind this project is to craft or create buildings for an imagined city and then tell the story of the people who live in your crafted buildings buy coding stories in Scratch. Connect Makey Makey for some physical computing fun!
| Craft a City |
|
In the last couple of lessons, we learned to create a playable drawing and code key presses. Today, you will learn how to make an interactive poster by crafting and coding interactive stories. We are sharing this idea from the LEGO Foundation who are "inviting kids to create the buildings, neighborhoods, and stories of #StoryCity, a collaboratively constructed and imagined city that will let kids connect around the world." (Learn more about #StoryCity in this webinar we had with Liam Nilsen from LEGO Idea Studio.) You can craft your city out of anything! Or you can make a drawing of your city. The first picture is an interactive #StoryCity poster, the second picture is a crafted #StoryCity by Liam Nilsen, and the third picture is a diorama made in a shoe box! You can craft your Story City however you would like! Either draw a city, build a city, or construct a city in a shoebox. The important thing is to imagine the buildings and the stories of the people who live in your crafted city. |
|
|


| Add Conductive Touchpoints to Your City |
|
Use thumbtacks, paper clips, or pencil drawings to make your city interactive with Makey Makey and Scratch. By adding different conductive touchpoints you are building the hardware that will go with the software you create in Scratch! |
|
|


| Program Events; Code Stories and Animations in Scratch |
|
Write the stories you want to tell on a piece of paper or type them up so you can record them easily into Scratch. If you use multiple sprites in your Scratch project, you'll have to record your stories with the correct sprite. Scratch is the software component to your interactive story invention! Let's look at some examples before you start coding your own software. Here is an example of a coded Story City drawing in Scratch. Press the UP arrow to hear one story. Press the SPACE bar to hear another story. Lastly, press the DOWN arrow to experience the final story. Here is an example of the coded story diorama in Scratch. To play along, Frederico asks you to find the pigeon drawing (press the SPACE key), the Family Portrait (which is connected to the UP arrow), the hiding dog (press the DOWN arrow), and the messy scribble by Bonnie (press the RIGHT arrow).
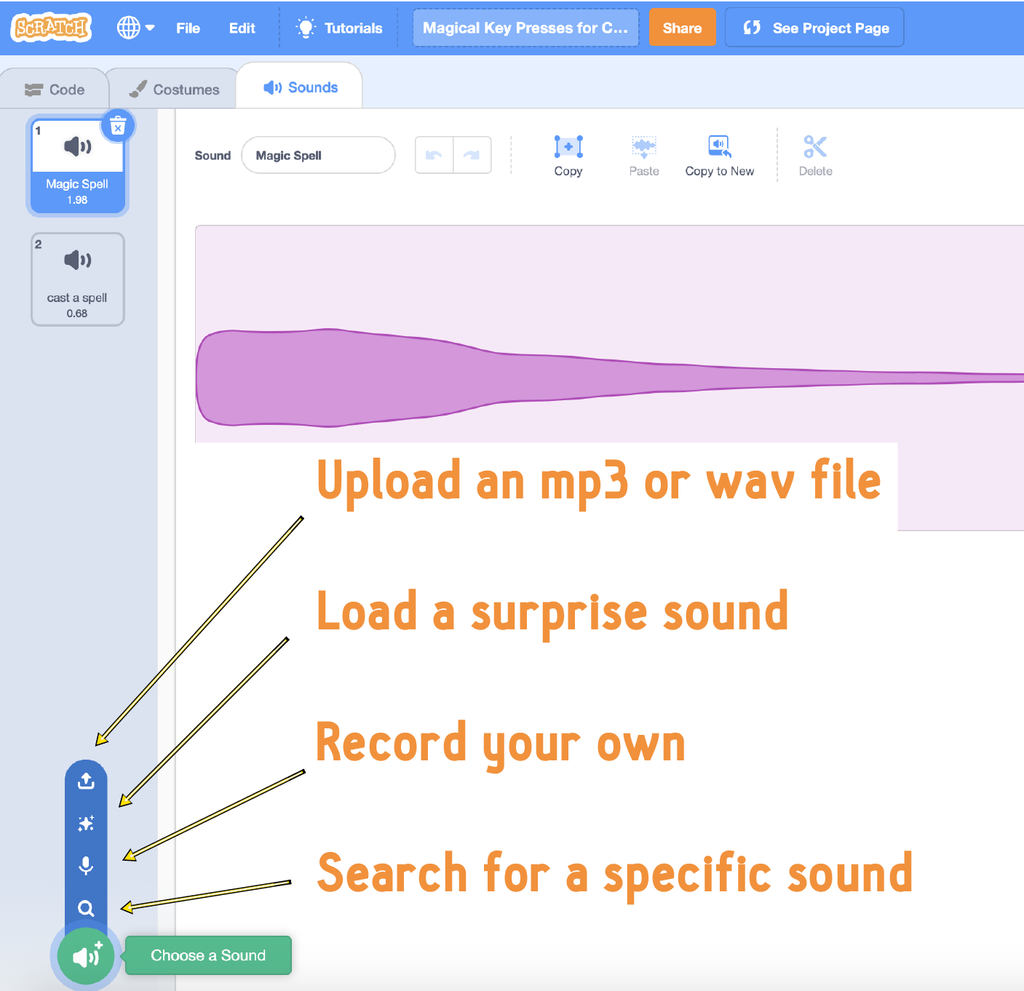
Record SoundsTo add your stories as sounds to your project, click on the "Sounds" tab where you can choose a sound from the Scratch library, record your own sound, or upload an mp3 or wav file to use in your project. Click on the microphone to record your own sound. When recording a story, you might want to record each sentence separately and name each recording so you can easily write the software program for playing your story in Scratch. Once you add a sound, you can find it in the "play sound until done" or "start sound" blocks. Try adding both sound blocks to see how they are different. |
|
|


| Coding Animations with Movement and Effects |
|
To get started making your story even more interactive, you'll need to understand a few things about coding. To create the software for your Makey Makey inventions, you have to speak to your computer in a language it understands! Computer language is known as software or code. You can write code in many different coding languages like Javascript, Python, and even block based coding languages like Scratch! In fact, you already coded a small program in Scratch to tell your stories in the previous step of this lesson. However, we can go even further by writing programs with Scratch code that combine your recordings with animations to really make your story come alive. Motion Blocks We can combine some motion blocks to animate the stories we create in Scratch. The motion blocks in the blue palette are all about making your sprite a mover and shaker! You can place your sprite anywhere on the screen and the x and y coordinates will update in the "go to" and "glide to" blocks. This is a fun way to make a sprite glide across your drawing. Make sure you always place your sprites in a start position, so that they always go to the start when you press the green flag to start your Scratch project. Go ToThis program starts my Scratch cat in the lower left corner of my screen and sets it to a size that makes the cat appear to be a part of my drawing. If you use different costumes for more animation effects, make sure you always set your sprite to start with the right costume.
GlideThe glide blocks add an amount of time for your sprite to move to specific coordinates. Try them out and see if they make your sprite appear to glide across your drawing!
XY CoordinatesLook for a full lesson on XY Coordinates Coming Soon! Show/HideAnother trick to making animations is to use the "show" and "hide" blocks in your algorithm. You can find these important code blocks in the purple "Looks" palette.
Can you tell what this program tells the Scratch cat to do in our drawing? Hint: We timed this with the sound of a door opening and closing!
RepeatSurrounding your program with a "repeat" block will create a loop and repeat those same steps over and over. Using a repeat loop helps you by letting you write the steps out once and tell the computer to repeat that series of steps as many times as you like. TurnIn the "donut" portion of our story, we made a spinning donut by using the "repeat" loop with the "turn" block. For a full lesson on loops and conditional statements, go here. (Lesson and link coming)
|
|
|


| No Coding Option (Plug and Play w Sampler) |
|
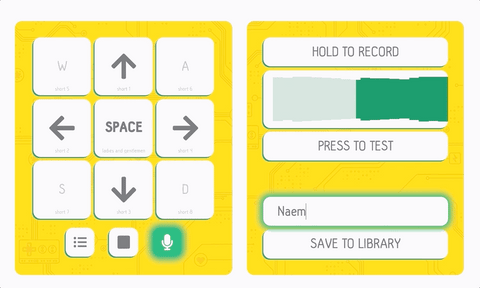
Note: For the Sampler, you need to use the arrow key inputs and WASD inputs. Recording SamplesOpen the Sampler App. Click on the microphone to start a recording. Make sure to allow the app permission to access your microphone! Press and hold on the microphone icon to record. (You have a limit of five seconds)
Press to test your sample, and click on the sound wave to trim.
Name your sample and save it to the library. (It will only be stored for this session, so if you like all your recordings and want to use them again. Make sure to export your sample pack once you have all your samples recorded and placed on the sampler. (Check out this Video tutorial)
Place all your recordings on the sampler where you want each Makey Makey input to play. Now you can hook up to Makey Makey and play your sounds!
|


| Hook up Makey Makey and Share |
|
Once you've coded your story in Scratch or recorded your sound bites on our Sampler App, you are ready to hook it up to Makey Makey and share it in our Scratch studio! In the next class, you'll learn how to use Makey Makey with MakeCode Arcade and learn how to remap Makey Makey to create a second controller!
|
|
|
Supplies
- Makey Makey
- Cardstock
- Cardboard
- Various Craft Supplies: Fabric, Washi Tape, Colored Papers, etc
- Conductive Office Supplies: Nickel Thumb Tacks or Binder Clips