


Hula Hoop Controller
Move with a Hula Hoop Controller
Katie Butzu and Mark Lyons designed this oversized directional controller to help gamify physical therapy practice. Beyond that it is a great way to incorporate whole body movement into playing digital games on your computer!
The Hula Hoop Controller was created specifically for a student with cerebral palsy who needed to work on gross motor coordination and targeted reaching. In his case, reaching above shoulder level. Katie wanted more creative ideas to help him with this work. She was thinking about how much he loved race cars and wondered if she could create something with a hula hoop that would help him work on his goals like improving his range of motion and control his movement patterns?
Introduction
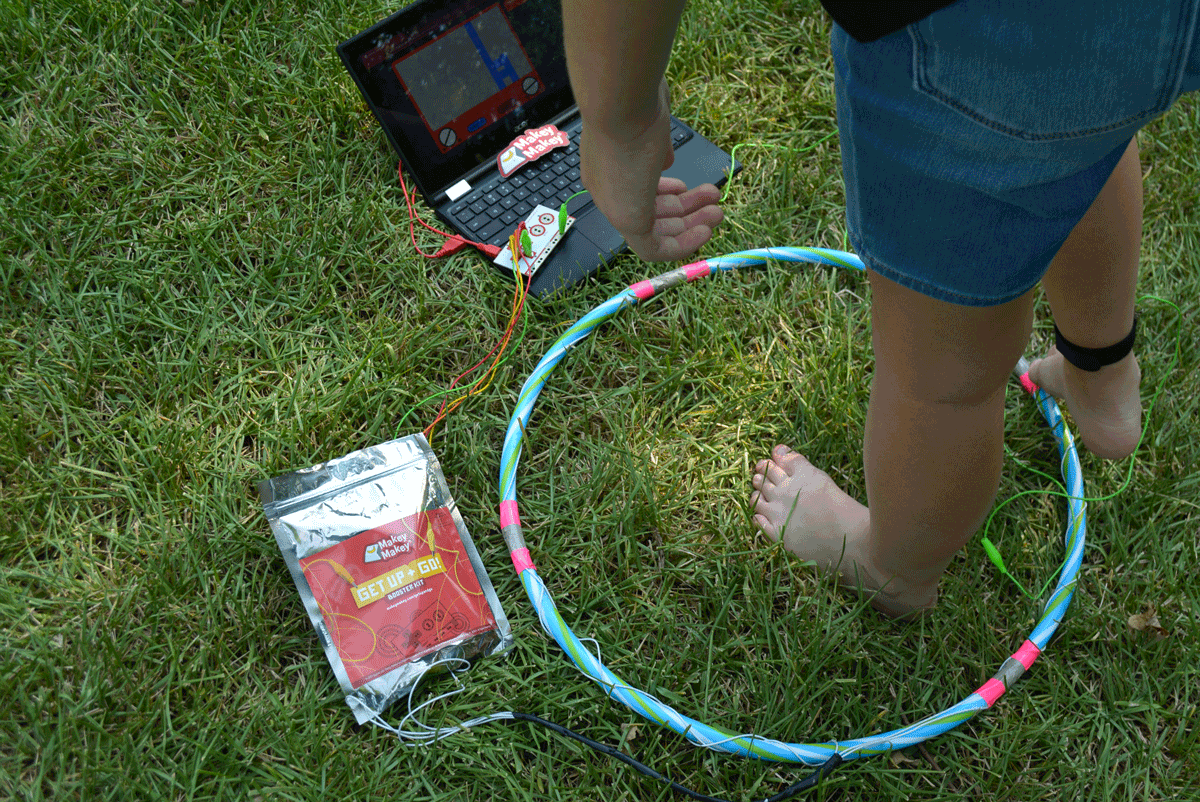
The invention she and Mark came up with is the hula hoop controller! By using Makey Makey, conductive tape, and a hula hoop, Katie could make a therapeutic exercise where he worked on all the same targets, but by playing a fun computer game.

This project uses a Hula Hoop, but that doesn't mean that you need to stick to just that to make your controller. If you prefer something else or do not have a Hula Hoop laying around, not a problem! Go look for other interesting oversized objects. Something like a large beach ball, frisbee or even a garbage can lid (as long as it is plastic.)
What You Need to Know...
Crafting Skills
Coding Skills
Time Investment
Background Information
This activity builds on a foundational understanding and experience with Makey Makey and circuits. This doesn't mean that you need an electrical engineering degree, but we suggest taking a bit of time and working through these recommended projects first.
Getting Started with Makey Makey
Hello Light

Learn about what a circuit is and the basics of electricity and conductivity to build your first paper circuit!
Is it Conductive?

Build a conductivity tester that uses Makey Makey to help you figure out what materials are conductive and which ones aren't!
Banana Piano!

Use bananas or any other produce to build circuits and turn them into piano keys using Makey Makey and our free Piano App!
Tools and Materials
This activity is one of our first projects that requires you to dig in and build something. Though the project itself is straightforward in building, there are a few tools and materials that you will need.

Tools
- Scissors - Used for cutting paper, tape and other things other than your fingers!
- Wire Strippers - For cutting wire and removing the outside insulated coating
- Makey Makey - The tool that makes the magic happen!
- USB Cable - The cable to plug the Makey Makey into your computer!
- Computer with Internet Connection - We will be using an app in Scratch that is shared online!
Materials
- Hula Hoop (NOT INCLUDED)- Move those hips!
- Duct Tape (NOT INCLUDED)- Sticks to everything! As many colors and patterns as you can find!!!!
Get Up & Go Booster Materials:
- Spool of Wire - Solid core is great!
- Conductive Fabric Tape- It's conductive and adhesive
- 6' Long Aligator Clips- Six feet long... and green!
- Velcro Wrist Band- Helps to keep you grounded to EARTH
Need Supplies? Time to Get Resourceful!
Maybe you want to use something other than a Hula Hoop? Ideas abound and we totally want you to play with the materials you have on hand or take a trip to your local second hand store or Dollar Tree to scout for invention material.

You may have noticed that not all of the materials above are included in our kits! That is OK and intentional; we want you to be resourceful and use materials that you can find at home, in the classroom or even out of a dumpster! It’s great to know this ahead of time so we recommend thinking about creating a stockpile of materials when you find them. We recommend holding onto the following materials / items when you find them…
- Breakfast cereal boxes
- Cardboard / shipping boxes
- Cardboard tubes
- Small broken electronic toys
- Tape, stickers, etc.
Building the Controller
Grab your Hula Hoop and other materials and let's build our controller! This project does take a new skill to some people and that is working with raw spooled wire. Let's take a bit of time and work through the proper way to cut it and strip off the insulation.

Cutting and Stripping Wires
Let's start by cutting the wires needed for the four touch points around the Hula Hoop!

Begin by measuring and cutting 4 equal length pieces of wire, the desired length is dependent on diameter of hula hoop and should measure to at least ½ the size of the hula hoop plus additional length to allow for plugging the controller into the Makey Makey.

Using the wire strippers, strip the ends of each piece of wire exposing at least 1” of the wire. If you are using wire stippers that have different gauges (sizes) like us, find one that barely cuts through the plastic. Also, most wire insulation has the gauge printed on it, check your wire for a number like "AWG20" or something similar and that is your gauge (20 in this case).
Create Conductive Touch Points
Now it's time to make a few decisions! Where do you want the four touch points around the Hula Hoop? For our example we are going to keep it simple and space them equally around the hoop at the Top, Bottom, Left and Right.

Begin by taking 1 piece of the prepared wire and place one end of the exposed wire on top of the tape touch point.
Take your conductive tape, and tape down the exposed speaker wire directly on top of the touch point. Doing this will allow the electrical current to pass through and secure the connection.

Next, secure the existing wire along the hula hoop using some clear tape making sure to not cover other aluminum touch point areas. Repeat these steps on all four spots on the Hula Hoop.
A great tip here is to label each wire with a piece of tape so that if you want to use your Hula Hoop later you know which wire is which!
Secure all 4 wires together at the bottom of the hula hoop using tape to ensure wires remain together.
Maker Tip: Colored duct tape can be used to outline the touch points which can act as a visual cue to allow the participant to easier locate the targeted touch point.

Hooking Everything Up to the Makey Makey
With the Hula Hoop Controller build complete, it is now time to get it hooked up to Makey Makey!

Now it is time to put your finished Hula Hoop controller in action! Begin by plugging the USB cable into your Makey Makey and your computer.
Using the labeled end of your exposed speaker wire: Hook a wire to an alligator clip. You can twist the speaker wire to the clip to ensure a secure attachment from the wire to the alligator clip. Repeat this step for each speaker wire.
Now hook each alligator clip to its corresponding area on the Makey Makey (UP wire to UP input).

Use the Anti-Static Electric bracelet, metal piece of jewelry, or attach an alligator clip somewhere in direct contact with skin to ground the participant. Hook up this grounding alligator clip to an ‘EARTH’ input on the Makey Makey.

Now it is time to get playing! The Hula Hoop controller can be paired with any game/app with directional keys.
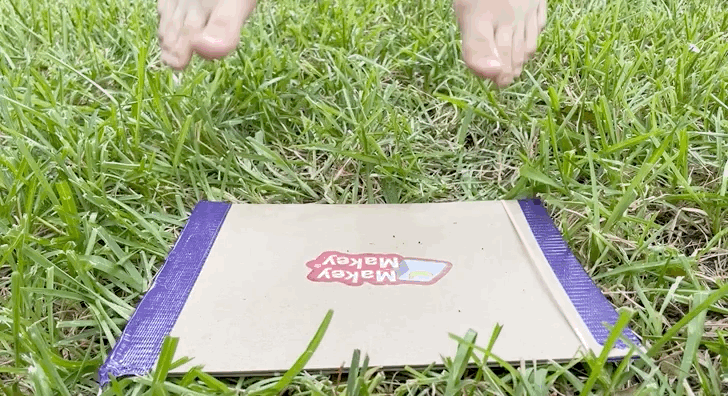
Drawing with a Hula Hoop!
With your Hula Hoop controller built it is now time to put it to good use as a controller for our NEW Make-a-Sketch App!
The Make-a-Sketch App is what it looks like. It is a digital app version of your tried and true childhood toy magnetic doodling toy!

Our app version is mapped to the Makey Makey arrow keys (UP, DOWN, LEFT, RIGHT) so it is plug-and-play as soon as you start using it. This means you can start drawing in the app right away with your Hula Hoop controller.
If you open up the control panel in the app you will notice that you can make a few changes to your pen size as well as the color. If you are looking for just a random color you can also use the Makey Makey "W" key to change the color to a random one. If you want to erase your drawing click on the Reset button in the app with your mouse. It is as simple as that! Now, let's see if you can level up your drawing skills. As an inspiration, check out what our 12 Year old artist created...

Take a moment and draw something with your Hula Hoop controller and our new Make-a-Sketch App!
Troubleshooting
Nobody likes it when things don't work the way you think they should! If you are having trouble with your guitar check out the following troubleshooting tips:
- Nothing works?! - Be sure to check your connections between you and the Makey Makey. Double check the connection to EARTH and your connection through the bracelet and it touching your skin.
- Thing seem backwards?! - A couple of ideas here! Flip your Hula Hoop Controller around and try it again, or check your wiring to make sure it isn't backwards
- A single point doesn't work - Check to make sure the wire and touch points are in contact with one another. Also, double check the wiring to the Makey Makey
Going to the Next Level!
You have only scratched the surface when it comes to alternative controllers and inputs with Makey Makey! Check out the list of other cool project ideas we have seen that use the Makey Makey in curious ways.
- Balance Ball Controller - Another full body alternative controller!
- Musical Paint Brush - Use a paint brush and a Makey Makey to make music while painting a work of art.
- Piano Chair - Can't leave your desk? You can still make wonderful music while moving around!
Once you've had your fill of Hula Hooping and need something a little different with Makey Makey, check out these other projects that come with the Get Up & Go! Booster Kit.
Other Get Up & Go! Projects
Stomp Switch Fun!
Build your own stomp page game controller. Flappy bird awaits for you to control it by jumping up and down!
Hula Hoop Controller
Turn a Hula Hoop into a fun way to draw and doodle on your computer!