


Stomp Switch Fun
Building a Cardboard Stomp Switch
Use this guide to create the ultimate stomping pad with Makey Makey. With this guide, you will learn to make an oversized weight sensitive stomp pad to control one button games and Scratch projects. Make two stomp pads to practice your jumping jacks or make four for the ultimate DDR dance mat! This durable floor pad uses rubber bands as an insulator and as an added bonus helps the floor pad stay in place.
Introduction
The Stomp Switch is a great addition to your Makey Makey toolbelt. It has a number of uses and all of them are super fun! From creating game controllers for Flappy Birds to creating a timing system for an obstacle course they are super easy to make and just something to have around because you never know when your next invention may need one!

In this project tutorial we walk you through making a single Stomp Switch. If you are looking to create something like a timer or a dance competition controller you may need more. That is ok! Just rinse and repeat these instructions to make as many as you need!
What You Need to Know...
Crafting Skills
Coding Skills
Time Investment
Background Information
This activity is a great introduction to creating projects that are about interaction, getting up and moving around. If this is your first time using a Makey Makey or want to reacquaint yourself with a few simple activities check these out.
Getting Started with Makey Makey
Hello Light

Learn about what a circuit is and the basics of electricity and conductivity to build your first paper circuit!
Is it Conductive?

Build a conductivity tester that uses Makey Makey to help you figure out what materials are conductive and which ones aren't!
Banana Piano!

Use bananas or any other produce to build circuits and turn them into piano keys using Makey Makey and our free Piano App!
Tools and Materials
This requires you to dig in and build something. Though the project itself is straightforward in building your stomp switch timer, there are a few tools and materials that you will need.

Tools
- Scissors - Used for cutting paper, tape and other things other than your fingers!
- Glue / Glue Stick - We will glue tinfoil to some cardboard, hopefully not our fingers!
- Makey Makey - The tool that makes the magic happen!
- USB Cable - The cable to plug the Makey Makey into your computer!
- Computer with Internet Connection - We will be using an app in Scratch that is shared online!
- Wire Strippers - Makes it easier to cut and remove insulation from wire!
Materials
- Tin Foil- For making the conductive pads for our stomp switch and a hat if you so choose!
- Cardboard- 2 pieces roughly 10" square, used for the top and bottom of our switch.
- Alligator Clips (2) - Two cables, different colors! (If you want to make more stomp switches, you’ll need more cables.)
- Spool of Wire - A great way to add length to any project!
- Duct Tape- Sticks to everything!
- Rubber Bands- So stretchy and a great insulator! Perfect place to find them is around your veggies.
Need Supplies? Time to Get Resourceful!
These stomp switches are made of cardboard, but you could make them out of any flat panel materials. You could level up and use plywood or even artists chip board. The main idea is to use a material that is flat but has some give or bend to it.

You may have noticed that not all of the materials above are included in our kits! That is okay and intentional; we want you to be resourceful and use materials that you can find at home, in the classroom or even out of a dumpster! It’s great to know this ahead of time so we recommend thinking about creating a stockpile of materials when you find them. We recommend holding onto the following materials / items when you find them.
- Breakfast cereal boxes
- Amazon shipping boxes
- Cardboard tubes
- Small broken electronic toys
- Tape, stickers, etc.
- bubble wrap (don't pop them yet!)
Creating Conductive Pads
We will walk you through building a single stomp switch here, but to complete our project you will need to repeat these instructions for at least one more for a single person race timer, but you can also build more if you want to have more people compete at a time. The main idea is 2 switches per competitor.

The first step in creating a conductive pad is to use your glue stick and adhere one foil square to one side of each piece of cardboard.

Make sure you leave a little foil off to the right side so you can wrap the foil around the end of the cardboard. This will help us create a strong connection for Makey Makey.
Place both touchpads side by side with the foil covered ends facing each other, foil side up.
Cutting and Stripping Wires
Measure and cut the wires needed for the conductive touchpads.
Begin by measuring and cutting 2 equal length pieces of wire, the desired length is dependent on how far you want your stomp pads from the computer plus additional length to allow for plugging the controller into the Makey Makey.

Using the wire strippers, strip the ends of each piece of wire exposing at least 1” of the wire. If you are using wire stippers that have different gauges (sizes) like us, find one that barely cuts through the plastic. Also, most wire insulation has the gauge printed on it, check your wire for a number like "AWG20" or something similar and that is your gauge (20 in this case).
Wire Conductive Pad
Now that you have created the base structure of the stomp pad and cut your wires, it is time to add the wiring!

Take the exposed end of wire and use regular tape to secure the wire to the spine of the foiled cardboard. (Make sure not to cover the exposed end with this insulating regular tape! That would be tragic!)

Now grab your conductive tape and use it to tape the exposed end of the wire to the foil on the cardboard. Make sure there is a good connection, by using multiple pieces of conductive tape over the wire to the foil. Cover all of the exposed wire with conductive tape.

This process will make sure the foil is conductive from the wire all the way across the foil length. Plus, it will hold our wire in place. Since you are going to be doing a lot of stomping, you want to make sure the wire will not move when you step on your stomping pad. Hiding the wire on the end of the cardboard ensures connectivity and durability, but it also makes it easier to keep the wires out of your feet's way!
Repeat this process for the other cardboard. Ensure that when the two pieces of cardboard are placed side by side with the foil covered ends, that the wire comes out in the same direction.
MAKER TIP: Conductive fabric tape is pretty cool! It's the same type of tape used in laptop and cable shielding, but since it is so flexible it can also be used for sewing and making wearables!
Protect Wiring
We have built the basics of the pads, now we need to make all of that wiring durable!
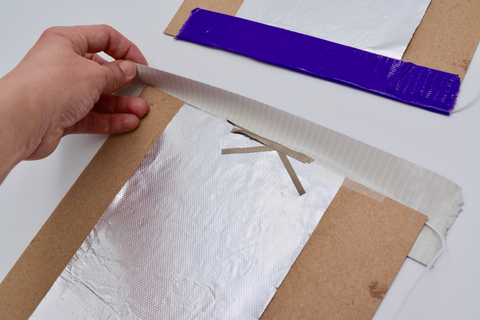
Cut two strips of Duct tape that will cover the short ends of your cardboard. (Our cardboard is about the size of a sheet of paper 8" X 11") Place half of the Duct tape on the outside of the conductive pad and the other half over the foil side to cover the connection you just made.

Place another strip of Duct tape to the other side of your conductive pad.

With your stomping pad open and the foil sides up, check to make sure you have both wires in the center and coming out the same direction. Then place Duct tape to hold the two together.

With the wires in the center, create a hinge to hold your stomping pad together by adding another piece of Duct tape over your wire protection tape. Make sure to use one piece of Duct tape on the inside of your switch and place another piece of Duct tape on the outside of your switch for durability.
If you plugged this into a Makey Makey at this point and closed it together, your stomping pad would make Makey Makey light up like a Christmas tree! When the two pieces of foil touch, it closes the circuit just like a switch. So now we need to add an insulator to break the circuit.
Adding an Insulator
To break the circuit and create a switch, you'll need an insulator. Adding an insulator to one side of your floor pad to keep the two conductive pads apart will make your circuit open until someone presses on your switch. (Or stomps on it!)

We like to use rubber bands as you can tinker with making a weight sensitive floor pad once you hook up a Makey Makey.
Maker Tip: You can add more rubber bands to make it harder to set off your stomp switch and remove rubber bands to make it more sensitive. The question you have to ask yourself is are you designing for a human? Or for your cat?
Wiring Up Pads and Adjust For Sensitivity
Let's connect those wires to Makey Makey and test your stomp switch!

Connect a black alligator clip to one wire and a red alligator clip to the other wire.

Now connect the black alligator clip to earth on your Makey Makey and the red alligator clip to the space input. You don't need to have the exact color here, but we just prefer using black or grey for EARTH and a red clip for the positive input- just like wiring up a battery!
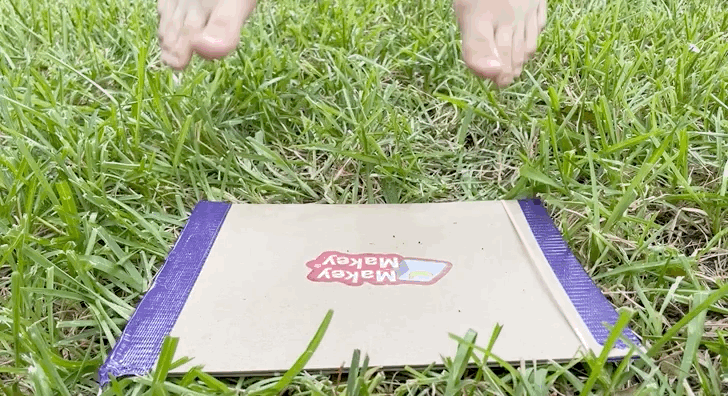
Let's test our stomping pad for weight sensitivity. Stomp on it to see if you are making a Makey Makey connection.
The more rubber bands you add, the harder you'll have to stomp to make a connection and trigger your Makey Makey input. If your switch isn't working at all, then take away some of the rubber bands. Or if it is too sensitive and connects too much, then add more rubber bands to add insulation between the two conductive pads.
Stompy Fun with Apps
The Stomp Switch is great fun when used to control different apps and games! Depending on the number of stomp switches you have created you can use them in a number of different ways.
Flappy Birds
Probably one of the most fun and addicting ways to use a stomp switch is to use it as your controller for the game Flappy Bird which is free and online.

Flappy Bird uses the space bar to control the flight of your bird to navigate through a maze of pipes. The further you get, the more points you gain.
Hook your stomp switch up to Space and Earth and use it to keep your Flappy Bird in the air while also getting a good workout in. We bet you can’t bear our high score of 23. Go ahead and try it out…
Stomp Switch Race Timer
If you build more than one stomp switch the number of applications goes way up. One application that we think is fun is to build a race / obstacle course timer. To do this we used two stomp switches and our new Makey Makey Timer App.

The Timer App is pretty straightforward, it uses two key presses: one to trigger a start and another to trigger the stop. You can adjust how the time is displayed in the options menu on the right hand side.

For a basic timer choose a single timer and the “Stopwatch” mode and we recommend “MM:SS:CS” for your time format if you are using two stomp switches for a single participant start/stop “beat the clock” type race. If you are using the single timer the keys for start and stop are LEFT (start) and UP (stop). To reset the timer use the SPACE key.

If you want to level up and go head to head with someone, all you need to do is build another set of stomp switches, change the number of timers to “2” and connect all of the Stomp Switches to the appropriate keys on the Makey Makey. You can now race head to head against another person whether you are in your own Ninja Warrior race or in a potato sack racing competition you can now definitively claim you are faster than your competitor. We bet you can't beat us in a race around the block…..and Go!
Buzz In App
The final App we recommend for the Stomp Switch is the Makey Makey Buzz-In App.

This app is designed to emulate a game show style buzz-in system. A “host” or leader of a game can “start” a session and then the individual participants can “buzz-in” by pressing their key associated with them. Using a Stomp Switch rather than a basic button as a buzzer is great fun and a different way of asking and answering questions from a group of people. Just connect each Stomp Pad to the defined key for that participant in the app and start buzzing in! Now you can be the next contestant in your own game show.
Troubleshooting
One of the things about building your own inventions is that they dont always work perfectly the first time, or sometimes the second time. Here are a few tips for working some of the bugs out with your stomp switches…
- Inside of your switches do the faces covered in foil face one another and align to one another?Do the touch when you close the two sides without any rubber bands?
- If your switches close when you are not stepping on them make sure that the two sides arent touching and that your wiring is insulated enough. Even a small area of the circuit touching will cause the switch to be "on".
- Try different thicknesses of rubber bands! If you find that your switch is still "on" you can use the thickere rubber bands to seperate the two sides a little more.
Going to the Next Level!
You now have a pair of stomp switches which we use for a race timer. Go out and use it to time yourself running a homemade obsticle course! Or, build more of them and challenge your friends to a race head to heard! If it is raining, use these stomp switches to play Flappy Bird inside! The options are limitless! Here are a few ideas and other projects that can help you iterate on this project and bring your ideas to the prototype stage...
- Balance Ball Weight Shifting Controller - Build a controller that uses a yoga ball and shifting your weight on it to control different key presses.
- Hula Hoop Controller - Use a hula hoop as a game controller!
- Interactive Chair - Add key presses to your office chair and use it to play music or games.
You now have a pair of stomp switches to use for a race timer. Go out and use it to time yourself running a homemade obstacle course! Or, build more of them and challenge your friends to a race head to head! If it is raining, use these stomp switches to play Flappy Bird inside! Or set up your own Dance Dance Revolution party! The options are limitless! Here are a few more ideas and other projects that can help you iterate on this project and to get your creative juices flowing.
Other Get Up & Go! Projects
Stomp Switch Fun!
Build your own stomp switch game controller. Flappy bird awaits for you to control it by jumping up and down!
Hula Hoop Controller

Turn a Hula Hoop into a fun way to draw and doodle on your computer!