


Sometimes pressing a button is just too much! What if you could use light to control your mouse clicks, press a key or better yet… make music on your computer! Using the Code-a-Key backpack with the micro:bit, we can do just that… build a flashlight piano!
| Materials and Assembling the Backpack |
|
This project focuses on creating a light-controlled piano, but as you build along with us be sure to be thinking about other applications and other keys that you could control. When we get to using your piano, take some time to explore the options you have available to you! It’s OK to color outside of the lines with this project.
This project is a simple one and only needs the following materials:
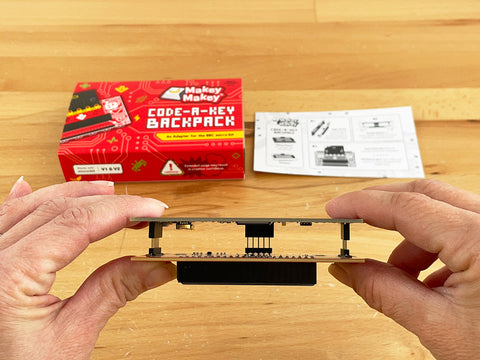 When you have everything together assemble the Code-a-Key backpack, Makey Makey, and BBC micro:bit as shown on the instruction card included with the Code-a-Key backpack. Remember, when putting the micro:bit into the backpack the LED array should be pointing out from the backpack.
|


| Adding the Code-a-Key MakeCode Extension |
|
To program the micro:bit, open Microsoft MakeCode for micro:bit and start a new project. NOTE: If you have never programmed your micro:bit using MakeCode, we strongly encourage you to take some time and spend some time walking through the tutorials listed at the beginning of this guide. The first step in building this tilt controller is to program the BBC micro:bit. Connect the micro:bit to your computer USB port using the micro B USB cable that came with your micro:bit.
Next, open up your web browser to the Microsoft MakeCode page for the micro:bit and start a new project.
To use the Code-a-Key backpack with the micro:bit, we first need to add the Code-a-Key Extension to your MakeCode project. Click on the Extensions code drawer and put “Code-a-Key” in the search bar of the Extensions window. The Code-a-Key Extension should be the only package that shows up. Click on the image to add it to your program.
With the Makey Makey Extension added we can now create our MakeCode program! Start by pulling the initialize Makey Makey block from the Makey Makey code drawer and place it inside the on start block. This will set everything up correctly for the micro:bit to be able to use the Code-a-Key backpack.
One best practice that we recommend for programs that use the Code-a-Key backpack is to also add a visual feedback on the LED array at the start of your program to let you know that the micro:bit is done initializing everything. We do this by adding the display icon block after your initialize block. The icon choice is up to you, but we like to use the heart icon! |
|
|


| Calibrating the Light Sensor |
|
Now that everything is added to your MakeCode project we can program the light sensor to trigger a key press based on varying degrees of light! Our approach to the light sensor project is going to be a little different than the projects and the code we have done in previous projects. In those projects we have relied on a lot of program event blocks to execute code when it is “loud” or when the micro:bit is “tilted left” or “shaken". These event blocks are wonderful and we use them all of the time, but sometimes we need a little more accuracy beyond just a “tilt”. This is where the good old fashioned if statement comes into play!
The general logic behind this project is that the light sensor will be four parts. First, we will calibrate the light sensor when the micro:bit powers up as well as when you press the A button. Then we will take the full spectrum of light values from the light sensor and then use an algorithm to map them to 5 values. Finally, we will read the ambient light above it and the Code-a-Key backpack and use an if/else statement block to press a specific key depending on that value. When that sensor value falls within a specific value the micro:bit will trigger a Makey Makey keypress. So, let’s jump in and start programming!
The first step in programming this project is to create a variable. This variable will store a calibration value initially at the start of our program as well as when we press the A button after that. Click on the Variables drawer and click the create variable button. Name your variable “Cal”. Once you have completed naming blocks the drawer will then have blocks to manipulate variables. From the drawer drag the set__ to __ block into the top of your on start event block.
Set the variable name to your Cal variable. We are now going to replace the value in this block with a reading from the light sensor. Open the Inputs drawer and scroll down and find the light level block.
Drag the light level block and replace the value in the set Cal to block. This will now take a single light level reading on start and store that value as a calibration value for us to use later in our program. |


| Polling the Light Sensor |
|
After setting a calibration value we now need to program the micro:bit to regularly capture the light sensor and translate that broad range of values (0-255) to six useful whole numbers (1-5) to use with an if/else statement. We will take the raw light sensor value and run it through an algorithm to produce our useful number. An algorithm is a set of rules or calculations in a program. It is a fancy way of saying “math equation”! We have to build our equation with blocks in MakeCode!
To build our algorithm we need to create another variable and we will call it “lightCalc”. This variable will store the final product. From the Variables drawer create a new variable and name it “lightCalc” and then drag in a set__ to __ block and place it at the top of your forever block. Change the variable you are setting to ‘lightCalc’. Instead of a hard number we are going to set the value of our variable to our algorithm. When building algorithms in blocks we tend to work from the inside out. The first operation we need to do is map the light sensor value (0-255, with 0 being dark and 255 being bright) to a smaller range to work with (1-6). There is a block for that! From the Math drawer find and drag the map __ from low __ high__ to low__ high ___ and place it on its own in your program space. Once we finish the algorithm we will place the whole thing in our variable block. The map block seems complicated, but once you understand its function it becomes super useful and will make sense to you. It takes a value (A) which has a known range of (B) to (C) and then scales or “maps” that value to an output range of (D) to (E). We need to scale the light, so let’s plug in values.
The first value (A) is going to be the light value variable block. From the Inputs drawer drag that block and place it at location (A). We know that the low value from the sensor will be 0 or dark. Type 0 into (B). The high value (C) is a little different. We will use our Cal variable block from the Variables drawer and place it into (C). We use this value instead of 255 because the calibration value is the highest ambient value from the micro:bits surroundings rather than assuming it is fully bright around the sensor. Finally, we want to map that value range to a low of 1 to a high of 6 (D and E). We do this to give us just 6 choices of values to apply logic to rather than a possibility of 256 different values that we then have to do the math to figure out. Let’s work smart, not hard!
The final step of building our algorithm is to take the value produced by the map block and round it to the nearest whole number. To round the number, open the Math drawer and find the round__ block. Now drag it into your program. What are you going to round? Yep, you are correct!
Drag the entire map block with all of its values into the round__ block. the set__ to __ block in your forever event block. Before moving on, be sure to double check your algorithm with our programming and ensure all of your values and blocks match! |


| Programming the Logic |
|
Now that we have a mapped and rounded value of the light sensor, we can now dig into the rest of our program.
From the Logic drawer drag an If block into your forever event block, just below your lightCalc variable. This if statement will control the logic of the light sensor. The if/else block has a hidden super power! It can expand for more complicated logic into an if/else if/else block by clicking the small plus sign at the bottom of the block. An if/else if/else is similar logic to a basic if/else block, but allows us to have multiple if options to be “true” rather than just a single one.
Click the plus sign so there are a total of 6 statements we can use as shown in the screenshot. Now, let’s build the first logical operator statement for the top if statement. From the Logic drawer drag in a __ = __ logic block (Logic blocks always have pointy ends!) and place it inside of the top if statement. From the Variables drawer bring in the lightCalc variable block and place it in the left side of the __ = __ block. We will be comparing that against the value of 1. The statement checks the mapped and rounded light sensor reading to a value and if it equals the value of 1.
Now, to populate the other logic statements! Let’s work smart and not hard and just duplicate the statement we just placed. Right click on the completed lightCalc = 1 block and select “duplicate” from the drop down menu.
Place the copied statement into the next opening down and change the value from 1 to 2. Repeat this process until all of the statements are filled and the values are changed up to the value of 6. Your if statement should look like our example above before moving on!
|
|
|


| Pressing Keys |
|
All we need to do is populate the if/else if/else statement with what we want it to execute when the micro:bit receives different light values! We are going to map each logic statement value (1-6) to a keyboard key on the back of the Makey Makey (W,A,S,D,F and G). In the end, we will use our piano app and play piano keys for each of these values! Each value will trigger a key press of one key and a release of all of the other keys not being used!
From the Makey Makey drawer drag in the press key __ block and place it inside of the first If statement. Select ‘W’ as the key from this block.
Now, to add a release key __ block from the Makey Makey drawer and place it just below the press key__ block. Select ‘A’ as the key to release. Repeat this process for the other keys to be released which are S, D, F and G. After placing your release key blocks your first if statement should look like the screenshot above. We now need to repeat this whole process for each value and change which key is being pressed and which keys are being released. You can duplicate blocks that you already have in your program and change the key values, or drag new ones in from the Makey Makey drawer. The lightCalc values should of 2-6 should correspond to the following keys as shown here:
When completed your program should look like this example code. |


| Recalibrating your micro:bit |
|
We have one last piece of code to add to our program and this is more of something nice to have rather than a requirement. When your micro:bit turns on it calibrates the light sensor by capturing the ambient light around it. But, what happens when those conditions change, or you were leaning over the micro:bit when it turned on? We need a way to recalibrate the micro:bit without just turning it off and back on again. We will do that by simply programming one of the buttons to do that for us!
From the Inputs drawer drag an on button A pressed event block into your program. We want to capture the light value into our cal variable again, so we will just duplicate the same set __ to __ block from the on start block and place it inside of our on button pressed block.
Finally, we want to give a bit of visual feedback to confirm that the recalibration took place. From the Basics drawer drag in a show icon __ block and place after the set__ to __ block. We chose a check mark icon, you can choose whatever you like. Finally, drag a clear screen block from the basics drawer and place that just after the show icon___ block. This will show the icon for a bit and then clear it so the led array can be used as the light sensor! Our final program is really long and hard to show in a screenshot while being legible. Please open the final project to reference and check your program against. With that your program is complete! Save your program to your micro:bit and now it is time to put it to use! |
|
|


| Using Your Controller |
|
Now it is time to make beautiful music with light! Get out your flashlight or light source and get ready!
Open up the Makey Makey Interactive Sheet and change the controls settings to match the screenshot above making sure that you have keys W,A,S,D,F and G mapped to piano keys. When they do, plug your Makey Makey with the micro:bit in the Code-a-Key backpack.
You should be able to hold your flashlight over the micro:bit and a key should be pressed each time the light changes which will then play a piano key. Move the phone up and down and this will play a series of different notes! See if you can play all 6 notes with your flashlight.
If you don’t seem to get a full range of keys, hold your light closer to the micro:bit and press the A button to recalibrate the light sensor. You should now have a full range of 6 notes to play! See if you can play a song with light!!! |

| Troubleshooting: If your Controller Doesn’t work |
|
This program has a number of places where things can go wrong! Here are a couple of things to check that we know can be issues…
|
|
|
| Going Further |
|
Take the concept of a light based controller and play around with it.Try different apps or games with the controller. See if you can invent an instrument that controls the light around the Code-a-Key and produce different key presses. Maybe something that can produce a predictable key press! Here are some applications that we thought of…
For more fun projects, check out:Code-a-Key Project #0 Hello World Code-a-Key Project #1 Stomp Switch Code-a-Key Project #2 Bouncy Face Tilt Controller Code-a-Key Project #3 Flashlight Piano (This guide) |
|
|
Supplies
- Makey Makey version 1.5 and Higher
- Code-a-Key Backpack
- BBC Micro:bit (V1 or V2)
- Micro USB cable
- Makey Makey mini USB Cable
- Flashlight / light source
Products
- Makey Makey Classic (v 1.5 and higher)
- Code-a-Key Backpack