


This game is called Drag Race, and it is our first 2-player button-mashing game where each player controls a car! The faster each player presses their assigned key, the faster their car goes. We will explore locations, simulating friction, and specific key event blocks. Let’s get our engines revving!
| Programming the Game / Setting the Scene |
|
If this is your first time using Microsoft MakeCode, be sure to start with our Introduction to MakeCode Arcade with Makey Makey for a brief introduction to the environment and using Makey Makey with MakeCode Arcade. Create a new game in MakeCode called ‘Drag Race’
 We need to set the stage for our game by setting the background. In the introduction, we used a background color. For this game, we will use a background image instead.  From the Scene drawer, select the set background image to ____ block. This block is similar to the background color block but enables you to use an image rather than just a color. Place the block at the top of your on start block and click on the swatch/thumbnail image in the block. 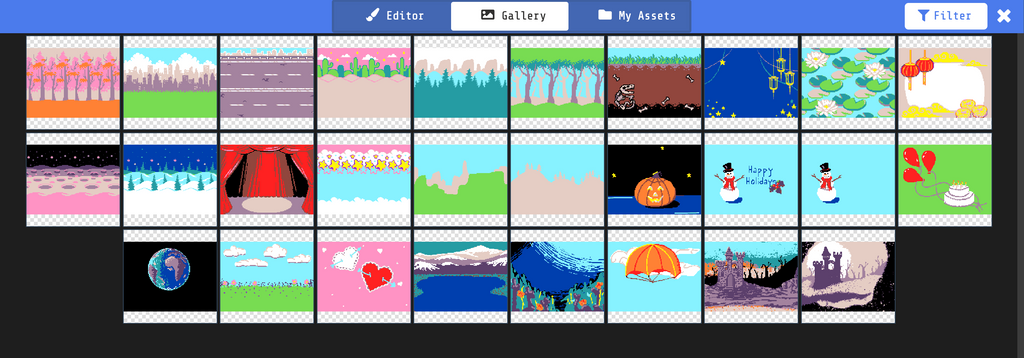 This should bring up an editor window similar to the one we used to create a sprite. At the top of the window, click on the Gallery tab and select the cityscape image. We are designing a car racing game, so the street background seems appropriate. You can take this game and modify the sprites and background later to create any other type of racing game! 
|
|
|
| Create and Code Car Sprites |
With the race location set, it is now time to create our contestants. This is a drag race game between two cars, so we must create two car sprites. This part of creating sprites has been covered in detail in previous games. We will create two different sprites using the set mySprite to_____ block from the Sprites drawer (one for each). Name the sprites ‘Player1’ and ‘Player2’, and set them both to a ‘Player’ kind.  MakeCode Arcade has several different colored car sprites in many different orientations. For this game, we will cars race from left to right on the screen, so we chose the cars facing the left!  Now, we need to set the starting location of the two cars! From the Sprites drawer, drag in two set mySprite position to x__ y__ blocks at the bottom of your on start block. Use the location finder tool to set the X and Y coordinates for each sprite. Be sure to set the x coordinates to the same value to make it a fair race as that is the starting position! (Note: we covered the location finder tool in the last guide.)
|
|
|
| Code speeding cars! |
We have two cars in position, it is now time to get them moving! In previous games, we have moved sprites using the simple move mySprite with buttons block, we will use a different block for this game! We will use the on __ button pressed event block. This event block executes whatever code we insert into it rather than just moving the sprite with buttons. This block has two options; the first is what button it controls, and the second is the state of that button (pressed, released, repeated).  We will need two of these blocks, one for each player. Player1 will use the left arrow key and Player2 will be attached to the right arrow key. Both states should be ‘pressed’. Our goal is to have either car be controlled and move when its matching on__ button pressed block is executed. To cause the cars (sprites) to move when the button is pressed, we use variables to track the “speed” of each car. Variables in MakeCode are like a digital bucket; they hold things. In this case, variables hold numbers, and the number we want to hold in this project is the speed of each car.  To create these variables open the Variables drawer. This drawer will be relatively empty until you fill it. Click on Make a Variable… and name your new variable ‘car1Speed’. This will be the variable that stores the speed of the Player1 car! Repeat the process and create a variable for ‘car2Speed’.  Now, when you open the Variables drawer again, you should have some newly created blocks! The primary blocks that you will use when working with variables are blocks that set a variable (place something into that bucket) using the set __ to __ or you can change a variable in some way using the change __ by __ block. Both of these blocks are quite handy and you will use them to store information as you build more complicated games.  You will also notice the rounded pill shape blocks as well. These blocks are the variables themselves. You will use these when you want to access and use their values. For our game, now that we have our two speed variables we need to set both of those variables to 0 at the start of the game. From the Variables drawer, drag two set__to__ blocks into the on start event block. For each block set the variable option (one each for car1Speed and car2Speed) and their value both should be 0.  With this variable now set to 0 at the start of the game, we can now manipulate or change them in our button press event blocks. From the Variables drawer, drag a change __ by __ block for each button press event block. For the on left button pressed block, select the ‘car1Speed’ variable and change it by a value of 3. This will add 3 to whatever value is currently stored in the variable. Repeat the process for the right arrow key and ‘car2Speed’. Before testing our game for the first time, we need to tell the cars to use the speed variables and move! We update the velocity of the two sprites every 100 milliseconds using the on game update every __ ms event block.  From the Game drawer drag in an on game update every __ ms event and set the milliseconds value to 100.  Inside the event block, we want to update the speed of each car sprite. From the Sprites menu drag a set __ velocity to vx __ vy___ block in for each sprite. Be sure that each block is set to the different sprites as shown. Then from the Variables drawer drag in the ‘car1Speed’ variable and place it into the vx value for the player1 and repeat the process for the ‘car2Speed’ in the player2 set velocity block.  You can now test your game! Start the game, and the more you press the left arrow, the faster the player1 sprite will go, and the more you press the right arrow, the faster the player2 sprite will go. |
|
|
| Code Friction! |
The cars move and you can race one another, but you may notice a few odd things. Primarily, the cars do not slow down when you stop pressing the buttons like they would in real life. When you take your foot off of the gas pedal, your car slows down. 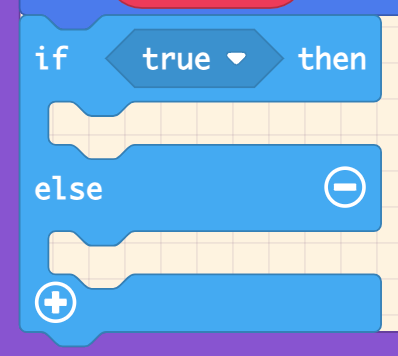 We can simulate the slowing down of the car by friction and gravity using an if statement to manipulate the speed variables. We want to use an if / else statement that uses the following logic: “If the car is moving (speed greater than 1); subtract 1 from the speed, else (the car is less than 1) set the speed to 0 (because we don’t want negative speed)” Let’s create this statement in blocks for one of the cars and you can test it out.  From the Logic drawer, drag an if ____ then ___else ____ block and put it at the bottom of the on game update block. Now, create the comparison block to insert into the if statement. From the Logic drawer, drag a greater than (>) block into your if / else block. Next, from the Variables drawer, bring in the car1Speed variable and place it in the greater than block as shown. Change the other value to the number 1 and now the statement should read car1Speed > 1. If this statement is true, we want to subtract the value of 1 from the car1Speed variable using the change __ by __ block with car1Speed being changed by (-1). If the statement is false ( this would be the else section of the if statement) then we set the speed to 0 using the set car1Speed to 0 block as shown above.  You should repeat the process for the car2Speed variable in a completely new if / else statement below the first one. Be sure that you are working with the car2Speed variable in it and not accidentally use the car1speed variable. 
|
|
|
| Create Winners! |
Your cars now function like a car in the real world. But we still need to program winning and losing. It is a car race, there should be a finish line. So, let’s create one! Let’s start by creating our finish line sprite! Drag a set __ to __ block from the Sprites drawer and insert it just below your other sprite block in the on start event block. Instead of selecting a pre-drawn sprite, let’s create our own using the drawing tool!  First of all, the finish line is going to span the entire roadway, so the sprite needs to be much larger than the standard sprite size of 16 x 16 pixels. In the lower left hand corner you can change the image size in width and height. Change the dimensions to 4 x 120. The image should change size and shape. We are going to keep things simple and go with a one-color finish line, you can get as fancy or elaborate as you want. Using the paint bucket tool from the toolbar and select a color of your choice from the options provided, the paint bucket tool will flood the image with color when you click on the object. Click the Done button! This creates a red stripe that we can now move around and use as a sprite and as our finish line. The final step here is to select a new kind from the sprite kind drop down menu and call it Goal.  Now, we can place the finish line wherever we want, but the ideal location would be the far right side of the screen and spanning the roadway in our background. Drag a set__ position to __ x __y block from the Sprites drawer. Set the location using the tool to something to the far right side of the screen and spans in front of both cars.  The final step is to program in what happens when a car overlaps with the finish line! We use the on sprite of kind ___overlaps otherSprite of kind ____ event block. You can find it in the Sprites drawer and drag it into your program. Change the final kind option to Goal.  We will place two blocks in the event block to broadcast the winner and both are found in the Game drawer. The first block is the use message____ for win block which will allow you to create custom messages for a win state at the end of the game! Drag it into your event block and add the text “WINNER!!!” as the message. Finally, drag the game over win block from the Game drawer and place it just below the message block. This will end the game and display the “WINNER!!!” message. 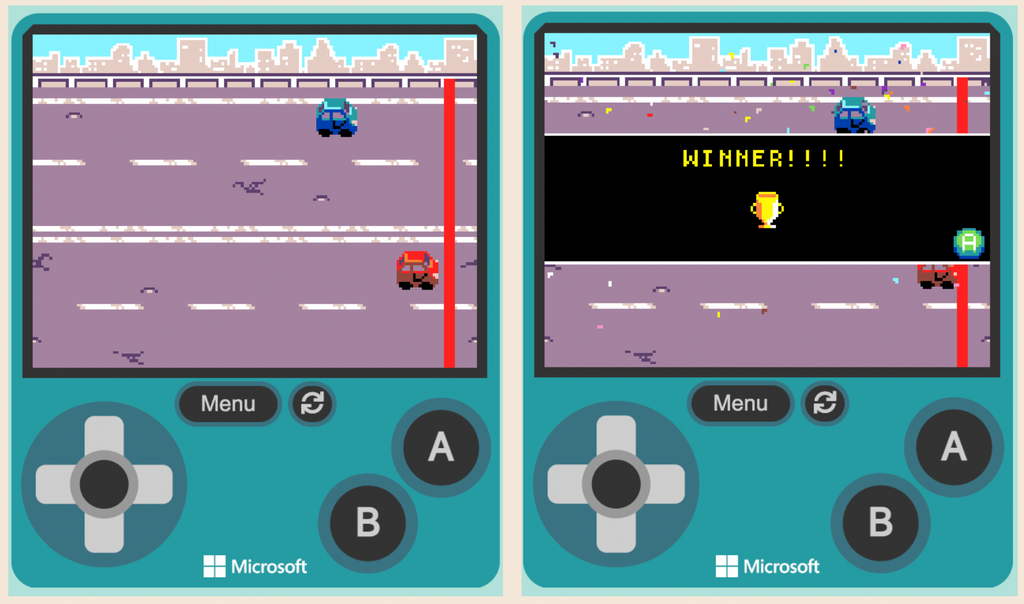 Now, test your game! With any success, both cars should be able to drive and the first one to touch the finish line will win and trigger the Game Over screen!  That is how you program Drag Race in Microsoft MakeCode! For a full reference of what our code should look like, you can check out the completed game here! |
|
|

| Create Controllers and Take it the Next Level |
|
Recommended Makey Makey Controller There are so many ways that you can incorporate a Makey Makey controller into this game. The one requirement is that you need one controllers for each player. Your game works with the direction arrows on Makey Makey: Left arrow input, and Right arrow input. A couple of controller options that we recommend are as follows.
Taking Your Game to the Next Level… We know that this game is rather simple and can get old quickly. It is designed to be a starting point for you to build from, not a finished product! We urge you to take the game to the next level and add to it. Change it up and make it your own! Here are some ideas to explore.
|
|
|