


This game is called Fruit Catcher, and it is a run-and-collect game where fruit tokens fall from random points at the top of the screen, and the player controls a character to move back and forth and collects the fruit before it hits the ground. Let’s dig in and start catching fruit!
| Setting the scene |
|
If this is your first time using Microsoft MakeCode, be sure to start with our Introduction to MakeCode Arcade with Makey Makey for a brief introduction to the environment and using Makey Makey with MakeCode Arcade.
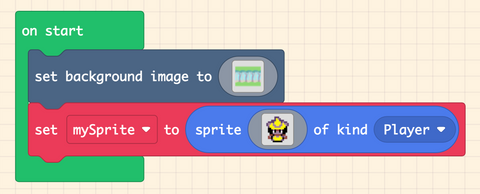
 We need to set the stage for our game, and that is done by setting the background. In the introduction, we used background color. For this game, we will use a background image instead.  From the Scene drawer, select the set background image to ____ block. This block is similar to the background color block but enables you to use an image rather than just a color. Place the block at the top of your on start block and click on the swatch/thumbnail image in the block.  This should bring up an editor window similar to the one we have used to create a sprite. At the top of the window click on the Gallery tab and select the image of the tree/forest image. Remember, this game is called “Fruit Catcher,” and the fruit is falling from the trees, but if you want to change the theme from fruit, feel free!  Once you select the background image, click Select. If you want to edit the background you can do that in the editor. To keep things simple, we will skip the editing and get to coding by clicking done in the lower right corner. |

| Set Player Sprite |
|
With the background selected we can now add the character (the catcher) who will be our player character.
We add a sprite by opening the Sprite drawer, adding the set mySprite to_____ block, and placing it just below the background block in the on start block as the image shows. The set mySprite to_____ block is a useful and powerful block, and you will use it a lot in creating games in MakeCode Arcade. We went over the details of the different parts of this block in our first game (Tag). If you need a quick refresh on these components, check out the sprite section in the Tag Coding guide.
Let’s set the sprite image. You have experience with this already, so let’s select the image for your player sprite now! Remember to think about the story you are telling and to select a sprite that would make sense for your game.
|
|
|

| Set Sprite Location and Move with Buttons |
With our player sprite created, we now need to place the sprite in the correct position on the screen as well as program it to be able to move back and forth.  From the Sprites drawer, drag the set mySprite location to x ___y ___ block and place it in your on start just below the set mySprite to ____ block. Make sure you select your player sprite name, and to set the location, click on either the X or Y number to bring up the location tool. Select somewhere at the bottom middle of the screen.  Now, apply controls to your character! Select the move mySprite with buttons block from the Controller drawer and drag it just below the sprite location block. Similar to the tag game, this block does a lot for us, but the main difference is that for this game, we only want the player character to move left and right and not up or down. To change that, click on the plus (+) sign on the block to open up the block details. This shows two velocity settings (vx and vy). Change vy to 0. Now your sprite will only move left and right, which means we’ve essentially turned the up and down movement off!  The final block to add to our program regarding character movement is to keep our character sprite in the window and not run off to infinity! We simply add a block from the Sprites drawer called set mySprite stay in screen block. This block does what it says and allows you to apply a rule to a sprite to stay in the screen with an on/off option. We want to set it to our character sprite and set the rule to ON. Test your game! Your character should be able to move back and forth, but not up and down. |
|
|
| Create Food Sprite and Code Velocity |
|
With our player character dialed in and running back and forth, it is time to make the fruit fall for it to catch! We need to repeat the process for creating the fruit sprite but in a different way. In our game, the fruit falls at a timed interval from a random location at the top of the screen. So, we need to create multiple sprites, one every 500 milliseconds (half a second) or so.
Enter the on game update every ___ ms event block! This event block is a timer, and the code inside is executed in increments of whatever time you set it to in milliseconds/seconds. Open the Game drawer and drag the block into your program area. The block’s standard timing is 500 milliseconds (half a second). Click on the drop-down and change it to 1 second!
We can now populate the event block with the required blocks to create our fruit sprite with an image of your choice and a player kind called food. This is similar to the player sprite and will be important later on!
Now let's learn the magic of creating the random starting location! We will be using the set mySprite location to x___ y___ block as we did with the player sprite, but we will be coding the x and y values ourselves rather than using the location picker tool. The Y value is easy; we want something just barely on the screen in the Y direction, and we found that a value of 5 works perfectly. But the X value takes a little more effort! Use the pick random block to set a random X location for the fruit sprite. The pick random block accepts two values: a minimum and a maximum. This block, each time it is called or used, will produce a random number between those two values. We recommend setting 10 as your minimum and 140 as your maximum. This way, all fruit will stay on the screen, but still offer a challenge for the player.
Finally, we need to make the fruit fall! We can add velocity to the fruit sprite using the set mySprite velocity to vx___ vy ___ block from the Sprites drawer. Drag it in and place it at the bottom of your on game update event block. This block accepts two values: a velocity in the X direction (vx) and the Y direction (vy). We want to add velocity in the Y direction to simulate the fruit falling! We do this by setting vx to 0 and vy to 50. Note: You can adjust your vy value as you see fit to make your game easier or more challenging!
Now, test your game! Your character should be able to move around (side to side), and fruit should start falling from the top of the screen. But, when you go to catch it nothing should happen! Why is that? Well, we haven’t programmed anything to happen yet… Let’s do that now! |
|
|


| When Sprites Collide! |
| To collect the fruit with our player, we need to add another event block that will be a foundation for future games you create. This event block is one that is triggered when two sprites overlap or collide!
Look for the on sprite of kind Player overlaps otherSprite of kind Player event block. This block resides inside the Sprites drawer under Overlaps. Drag it into your program! This block is an event block that executes code when two sprites of the specified kinds overlap! This event block allows you to check the types or kinds of each sprite and trigger an event when these two types of sprites overlap or cross paths. In this game, we have two types. The first sprite is a Player kind and the second otherSprite sill be set to a Food kind. This event will only trigger when our Player sprite overlaps with a Fruit sprite and not when a Fruit sprite overlaps with another Fruit sprite. This event block also has what are called local variables. Local variables are the red sprite block and otherSprite blocks in the block's title. This enables you to work with just the two sprites that are actually colliding rather than all of the fruit sprites at the same time. Why would you want to do that? As an example, we want to destroy the fruit sprite that we overlap with and only that sprite, not all of the fruit in the window.
So, from the Sprites drawer, drag in the destroy otherSprite block and place it inside of your on sprite of kind Player overlaps otherSprite of kind food event block. Now from the title of the event block drag in the red otherSprite block into the Destroy block. When this code is executed, it will only destroy the fruit that overlaps with our player (locally) and not destroy all of the fruit (globally). Test your game! You should be able to move back and forth and when you overlap a fruit it should disappear! |
|
|


| Adding Timer and Scoring |
| Our final step towards completing our Fruit Catcher game is to add two things… a time limit and scoring. These things are fairly simple and only require a single block to add that functionality! For setting a time limit for your game, open the Info drawer and drag the start countdown__(s) block into the bottom of your on start event. This will allow you to start a countdown time at the start of the game that then ends the game when it reaches 0. Setting the countdown to 30 seconds feels like a good game length. However, you can change yours to whatever you want!
Finally, for scoring, we again open the Info drawer and drag the change score by ___ block into the overlap event, under the destroy otherSprite block. This will increase your score by whatever number you insert into this block. We kept it simple and just left it as 1. With that, your Fruit Catcher game is complete! Feel free to catch as much fruit as possible, modify the game to make it a little harder, and challenge your friends to catch as much fruit as they can!
That is how you program Fruit Catcher in Microsoft MakeCode! For a full reference of what our code should look like, you can check out the full game and code in MakeCode here.
|
|
|


| Create a Controller and Next Steps |
|
Recommended Makey Makey Controller There are so many ways that you can incorporate a Makey Makey controller into this game. The one requirement is that it needs the four direction arrows for you to control your character’s movement: up, down, left, and right. A couple of controller options that we recommend are as follows. Taking Your Game to the Next Level… We know that this game is rather simple and can get old quickly. It is designed to be a starting point for you to build from, not a finished product! We urge you to take the game to the next level and add to it. Change it up and make it your own! Here are some ideas to explore.
When you are satisfied with your game, head to the next guide to learn how to code a Drag Race game! (Link Coming SOON!) |
|
|
Supplies
- Makey Makey
- Create your own Controller!