The new Code-a-Key Backpack! Bringing the Makey Makey and the BBC micro:bit together for more invention fun!

Makey Makey Interactive Poster

This activity allows you to combine Makey Makey and our Interactive Poster app to create an interactive poster.  While designing your own interactive poster, you will investigate how circuits work. Plus, you'll begin to think about user interface design and how it is important when designing physical computing projects. Extensions include coding your own poster with Scratch.

Research Poster Topic

Create a poster about the topic you want to share! You can make an interactive body systems poster, interactive display about an animal, display the life cycle of plants, share great poetry, and more! The possibilities are endless!

Once you've researched a topic, design a poster with images and text to display what you've learned. 

Create Conductive Touch Points and Finish Poster Design

Use conductive materials to create conductive touchpoints on your poster. When designing a user interface, think about the age of people who will be using your poster to learn about your topic. User interface design is an important stage in inventing!

  • Is it obvious where to hold EARTH on your poster?
  • Can users tell how to play sound effects when they walk up to your poster?

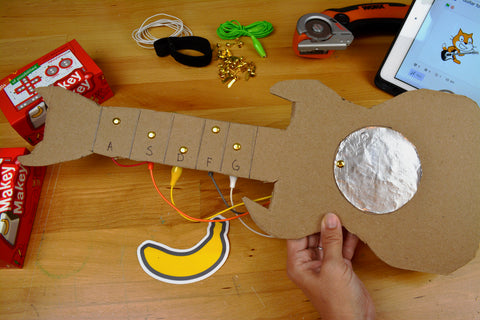
First decide what materials you want to use to make conductive touch points on your poster. You can use pencil lead (we prefer 6B pencils which have heavier graphite than your average pencil), metal paperclips, tin foil, etc. (Want to know what items are conductive? Check out this project to learn more.)

    Download and print this conductive materials list! 

    Metal Thumbtacks

    You can use metal thumbtacks for conductive touch points. Press into cardboard and connect alligator clips on the back of the poster. 

    Back of the Poster

    We added styrofoam on the back of our poster to stabilize it since the alligator clips add bulk. Think about how you want to frame your poster so users can press conductive touch points and your poster maintains stability.

    Close up

    Pencil Drawing

    Pencil drawings work great as conductive touchpoints, but the graphite might come off on your fingers and you may have to redraw your circuits over time. Make sure lines are dark and thick and that the alligator clip is connected directly to the pencil drawing.

    Brass Fasteners

    This is one of our favorite supplies for creating conductive touchpoints! Press the fastener through your poster and fold the legs of the fastener on the back so you can clip your alligator clip directly to the fastener on the back of the poster. 

    Mixed Items!

    You can always mix items, but make sure that your user knows how to play sounds on your poster!
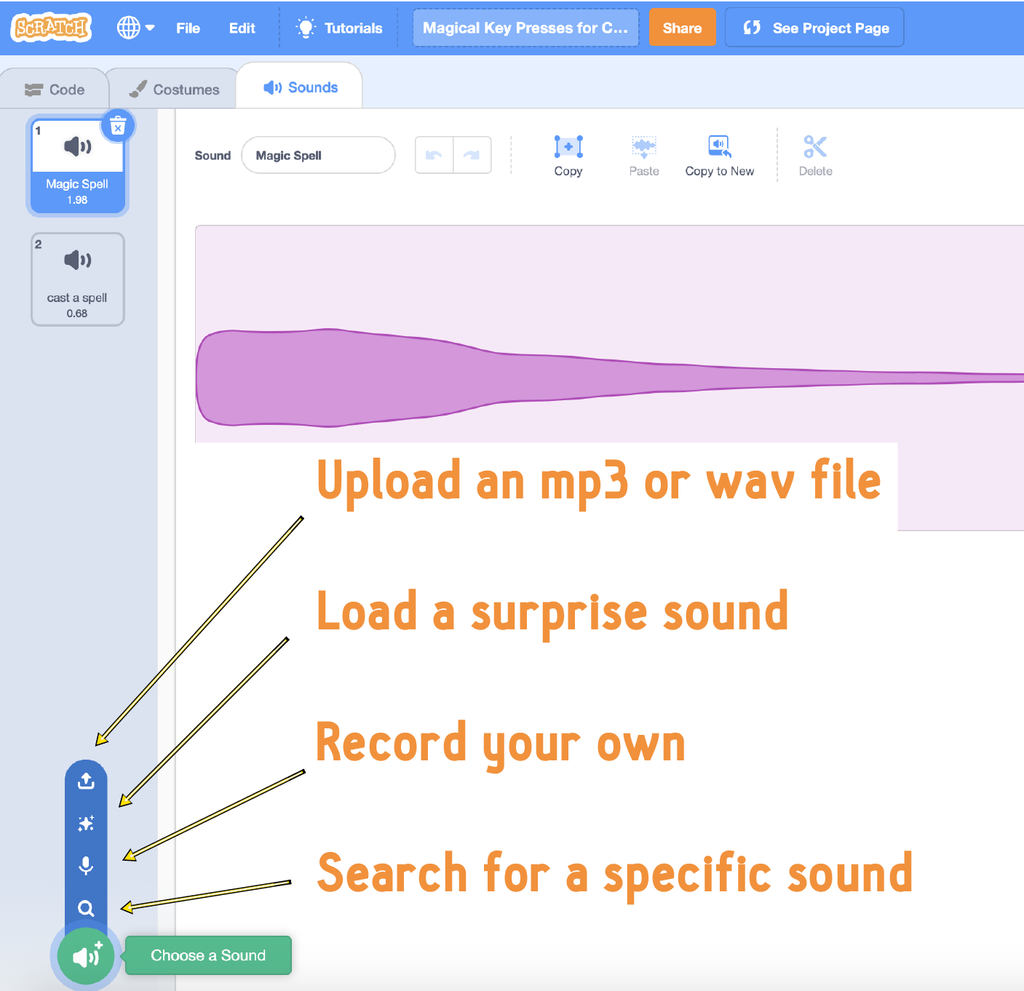
    Full How To Video for this Project

    You can record your audio directly into our Makey Makey Poster App, Sampler App, or record and code audio in Scratch.

    Recording Sounds

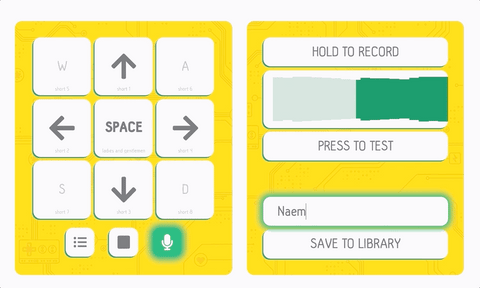
    If you are recording poetry, make sure your voice matches the mood and tone of the poem you are sharing. Practice what you will record multiple times before recording. 

    Makey Makey Sampler

    You can record your voice samples in our Sampler app and connect straight to Makey Makey for a plug and play experience!

    Click on the microphone to record. Press and hold to record. (You have a limit of five seconds)


    Press to test your sample, and click on the sound wave to trim.

    Name your sample and save it to the library. (It will only be stored for this session, so if you like all your recordings and want to use them again. Make sure to export your sample pack once you have all your samples recorded and placed on the sampler. (Video tutorial) 

    Place all your recordings on the sampler where you want each Makey Makey input to play.

    Then Export your sample pack.

    Save the exported sample pack to your drive our Google Drive and then you can upload your sample pack when you are ready to plug it to your poster.


    Makey Makey Interactive Poster App

    Want to add your own images and your own sounds but aren't ready to code yet? You can plug and play with our Makey Makey Interactive Poster App

    To add a sound or visual to a key press, select a key, click on the corresponding button. You can also select the keypress you want by using your Makey Makey!

    On the right side you have a visual creator and an audio creator. With a keypress selected (the selected keyboard key turns yellow when selected), click on the upload arrow in the visual creator to add a web, jpg, png, or gif file. Or click on the audio creator to upload a wav or mp3 file.

    Make sure to allow the app to use your camera and microphone

    allow app to use camera and microphone

    Once you've uploaded a photo to a key press, you will see it in the visual creator on the right hand side of the screen. Enabled your microphone and hold the button to record sound, just like in our Sampler app.

    recording sound in poster app

    With your sound and image uploaded, now when you hold down the up arrow key, the picture and sound you added will display in the screen area. Add up to 18 images and sounds. When you have all of your images and sounds mapped, you can click the download arrow in the center of the screen to export the entire poster and re-upload as needed. 

    Remapping Makey Makey Mouse Controls for Makey Max

    With our Makey Makey Max Backpack, you can have up to 18 inputs with one Makey Makey!

    (Click to this guide for full remapping instructions for Makey Max.)

    Scratch

    If you want to code your project, you can use Scratch as a free block-based programming environment. In Scratch, pick a sprite, and open the sounds tab. (Your sprite can be an image you uploaded or a sprite from the Scratch sprite libraries.)

    In the sounds tab, you can upload your own mp3 or wav file, load a surprise sound, or record a sound by clicking the microphone button. If you recorded a sound in Audacity, then upload your mp3 here in the sounds tab. Or follow directions below to record your sound in Scratch.


    Once you click the microphone to record or upload a sound, you can edit your sound and add effects. Make sure to name your sound so you will be able to code key presses easily.

    Now that you have sounds in Scratch, you can easily code the sound to play on a key press. Make sure to assign each sound to a different key press so you can trigger sounds with different Makey Makey inputs.

    To trigger sounds with a key press, you can use the "when key pressed" hat from the yellow "events" palette.


    Or you can add the Makey Makey Extension and use the "When Makey Makey Key pressed" hat. 

    Coding Multiple Sounds on Multiple Sprites

    In our Black History Month Scratch Project, we coded each sprite to play the reading of a poem. Since the poems are long, we added the code "stop all sounds" under the triggering event so that the sounds will not play on top of one another. 

    Check out our Black History Month Scratch Project.


    Extensions

    Now that you've made an interactive poster, try out some of these projects.


    Time Investment
    45 min- 1 hr
    Grades:
     4th- 12th

    Supplies

    Welcome

    Lorem ipsum dolor sit amet, consectetur adipiscing elit. Aenean pharetra, ligula non mollis pretium, lectus libero sodales augue, interdum auctor mauris dui non risus. Nulla facilisi. Nunc rutrum diam in elit sagittis eget viverra erat viverra. Morbi imperdiet aliquet libero vel rhoncus. Integer.