


Let's turn things up to 11 by crafting our own cardboard guitar! Learn to upload your own guitar sounds to the Makey Makey Sampler, or code sounds in Scratch to turn recycled cardboard into a musical instrument!
| Craft a Cardboard Guitar |
|
Grab a sheet of cardboard and cut out a guitar shape. (Download our PDF template)
Grab some brass fasteners to make conductive touchpoints and let's get started!
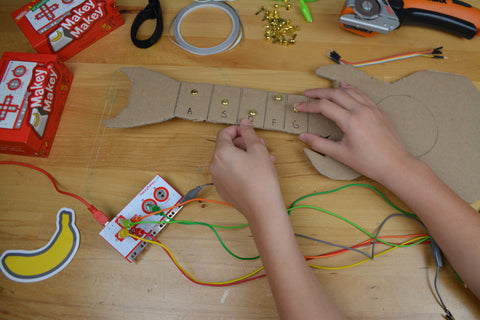
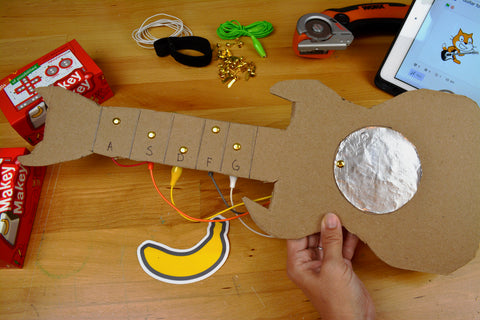
Fret MarkersGive your cardboard an authentic feel by drawing some fret board markers to show where to play different chords or sounds. Label the keys you will use with Makey Makey: A,S,D,F,G Use a lid or your conductive tape roll to draw a circle for your EARTH connection. This is where you will strum the guitar. The EARTH connection is what you will use as your grounding wire.
Create Conductive TouchpointsUse brass fasteners (or loose change and conductive tape) to create the conductive touchpoints on your cardboard frets for the keys ASDFG.
Use foil and a gluestick to make your EARTH connection where you will strum the guitar. Poke a brass fastener from the front to the back, so you can easily clip to this connection on the back of your guitar.
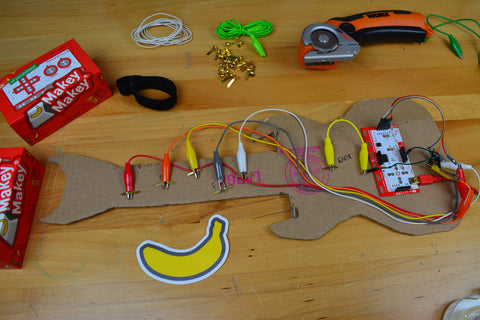
Back of Makey Makey: Wire it UpTake the colorful jumper wires from your booster kit or STEM pack and plug them into the back header marked A S D F G. You can color code alligator clips from the header to the guitar to assist when connecting to the sampler or Scratch.
For your EARTH connection, clip an alligator clip onto the brass fastener that is connected to the foil strumming spot. All of the key presses are now an open circuit. To close the circuit and play the guitar, you will press on one of the brass fasteners on the head of the guitar and "strum" the foil. When you touch both a key press input and the EARTH input, your body will bridge the connection sending a signal to the computer that a key is pressed! Plug to Makey MakeyPlug in your Makey Makey to the computer, and let's create some music!
Get Ready to Jam!Your cardboard guitar is ready to jam! Test your connections with this makeymakey.com/hero project. This project is coded to A S D F G Makey Makey inputs.
Want to Make Your Own Music?Follow the steps in the next section to add music. You can plug and play with our Makey Makey Sampler, Record your own sounds in our Sampler, or code your project with Scratch.
Here are a few more ideas to inspire you:
|


| Jam out on the Makey Makey Sampler |
|
You can jam out with our makeymakey.com/hero app, but when you are ready to make your own music, here are a few tips and tricks to get you started. You've crafted an amazing guitar, so let's upload some rad guitar samples and jam out on the Makey Makey Sampler! Note: For the Sampler, you need to use the arrow key inputs and WASD inputs. You can add your own guitar sounds actually playing a guitar and recording it into our Sampler, or you can search for some wav files to upload. Recording SamplesClick on the microphone to record. Press and hold to record. (You have a limit of five seconds)
Press to test your sample, and click on the sound wave to trim.
Name your sample and save it to the library. (It will only be stored for this session, so if you like all your recordings and want to use them again. Make sure to export your sample pack once you have all your samples recorded and placed on the sampler. (Video tutorial) |


| Guitar Sounds in Scratch |
|
Scratch was created at MIT and both of our inventors (Jay and Eric) were actually on the Scratch team! Scratch is a free online coding playground where you can create your own stories, games, and animations with coding blocks. If it is your first time to look at Scratch, take a moment to look at how everything is laid out. It has code blocks on the left, each grouped by color in palettes for the different things you will want to use to control your sprites: motion, looks, sound, events, control, sensing, operators, variables, and my blocks (where you can create your own blocks.) You have multiple options for coding a guitar in Scratch. You can: choose sounds from the sound library, use a guitar sprite, add the Music extension, or upload/record your own sounds.
Choosing Sounds from Sound LibraryPeople love to use Makey Makey and Scratch to create custom sound effects! In fact, the piano app on our webpage is based on a Scratch piano! To add more sounds to your project, click on the "Sounds" tab where you can choose a sound from the Scratch library, record your own sound, or upload a mp3 or wav file to use in your project.
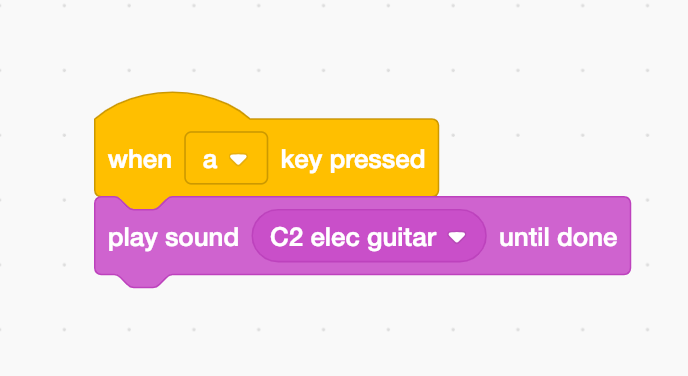
Let's look for guitar sounds already loaded in the Scratch library. Click on the magnifying glass to search the sound library. In the tab called "Notes" you will find notes from different instruments. Hover over the play button to hear the sound. When you find the sound you like, click on the sound to add it to your sounds tab. Once you add a sound, you can find it in the "play sound until done" or "start sound" blocks. Try adding both types of sound blocks to a "When key pressed" hat block to see how they are different. Then make sure to code each note to play on the desired key press. Note on Coding: A hat block starts a script- think of it as a way to trigger something to happen in your project. Scratch works by connecting stacking blocks to hat blocks. The hat blocks trigger the stacking blocks which instruct the sprites in your project how to behave.
Guitar SpriteThis is one of the easiest way to program an electric guitar in Scratch! Every new Scratch project starts with the Scratch Cat in your Sprite work area. A sprite is what you program in your project to choose a new sprite, hover over the new sprite menu, and similarly to sounds, you can choose a sprite, paint a sprite, or upload a sprite!
Just choose an electric guitar from the sprite library and a full scale of guitar notes will magically appear in your sound tab! (Okay, it isn't magic, but still it is still cool, right?!)
Once you choose a guitar sprite, the musical notes will appear in your sounds tab.  Trigger Event: Play Sound When Key PressedOnce you add a sound, you can find it in the "play sound until done" or "start sound" blocks. Try adding both sound blocks to see how they are different. Note on Coding: A hat block starts a script- think of it as a way to trigger something to happen in your project. Scratch works by connecting stacking blocks to hat blocks. The hat blocks trigger the stacking blocks which instruct the sprites in your project how to behave.
Music ExtensionIf you know about musical notation from playing a piano, you might find using the midi notes in Scratch a fun way to code your guitar. To start, add the Music Extension from the Extension panel.  With this option, you'll want to use the "set instrument" block at the start of your project. There are 21 instruments to choose from in Scratch and instrument 5 is an electric guitar. Add the "set instrument" block to the "When flag clicked" block to set your sprite to an electric sound.
If you want the guitar notes to play when you press WASDFG, you will add a "when __ key pressed" for each note you want to program in your workspace. Attach a "play note __ for __ beats" to each key press input.
To change each note, click into the play note variable and a keyboard will pop up like in picture 4. Choose the key note you would like to program. Use the arrow keys to adjust the octave of your desired note.
Now that you've got your sounds ready, plug your Makey Makey into the computer, hold onto the note you want to play, and strum the EARTH foil to play music! 
|


| More Musical Ideas |
|
What are more ways you can use Makey Makey to play music?
Full Scale PianoYou can get more complicated with your build and make an oversized full scale piano with this Scratch project. Oversized Full Scale PianoGaragebandIn this guide by Frazer Merrick, learn to create and control your very own backing track. Using the sturdy stomping pads, you can play a stomping bassline or a thumping drum beat with your feet whilst playing another instrument at the same time.
Garageband Guide by Frazer Merrick
|

Supplies
- Makey Makey
- cardboard
- conductive tape or foil
- brass fasteners
- foil
- hook up wire
- alligator clips
EDU Standards